
296: Mercury Editor
(view original Railscast)
Other translations:

Mercury is a project by Jeremy Jackson that allows you to edit sections of an HTML page directly in the browser. You can see it in action by clicking “Test it Out” on the project’s home page. Doing so adds a toolbar to the top of the page and highlights certain sections of it. You can then edit these sections directly and save the changes back to the server. In this episode we’ll add Mercury to a Rails application.
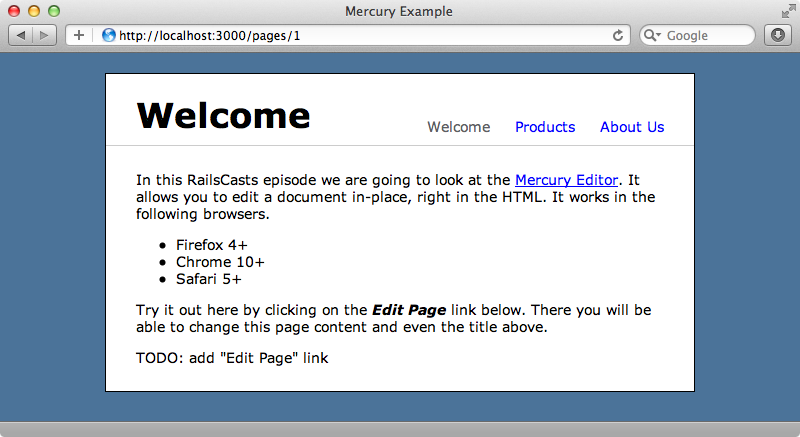
Below is a page from a simple Content Management System. This application has a Page model and three page records each with a name and some content. Currently there’s no way to edit the pages so we’ll add Mercury to the app so that we can edit them directly.
Installing Mercury
The first step to installing Mercury is to go into the /Gemfile and add the mercury-rails gem. This gem is being developed fairly rapidly so we’ll grab a recent version directly from Github.
/Gemfile
source 'http://rubygems.org'
gem 'rails', '3.1.1'
gem 'sqlite3'
# Gems used only for assets and not required
# in production environments by default.
group :assets do
  gem 'sass-rails',   '~> 3.1.4'
  gem 'coffee-rails', '~> 3.1.1'
  gem 'uglifier', '>= 1.0.3'
end
gem 'jquery-rails'
gem 'mercury-rails', git: 'jejacks0n/mercury.git', ref: 'a2b16bcdc9'
The commit SHA of the version we’re using is included above so that you know which version we’ve used. As ever once we’ve changed the Gemfile we’ll need to run bundle to install the new gem.
Once the gem has installed we need to run Mercury’s installation generator. This will ask us if we want to install the layout and CSS overrides files and we do.
$ rails g mercury:install
      create  app/assets/javascripts/mercury.js
       route  Mercury::Engine.routes
Install the layout and CSS overrides files? [yN] y
      create  app/views/layouts/mercury.html.erb
      create  app/assets/stylesheets/mercury_overrides.css
The output from this command tells us that we need to run another command to install Mercury’s migrations so we’ll run that next and then migrate the database.
$ rake mercury_engine:install:migrations
Copied migration 20111108202946_create_images.rb from mercury_engine
noonoo:cms eifion$ rake db:migrate
==  CreateImages: migrating ===================================================
-- create_table(:images)
   -> 0.0017s
==  CreateImages: migrated (0.0018s) ==========================================
Our application now has a mercury.js file in its app/assets directory. This file contains all of the configuration options for Mercury and comments explaining them. We’ll come back to this file later; first we’ll address how this file is loaded. In a Rails 3.1 application this file will be loaded by default on every page as the application.js manifest file includes every file under app/assets/javascripts. Mercury is quite JavaScript-heavy so we only want it to load on the Mercury-editable pages. We’ll modify the manifest so that is only loads the files we specify. (As an alternative we could move the mercury.js file out to /vendor/assets instead.) When we’re editing a page Mercury will use its own layout file that includes this JavaScript file so though it appears that we’ve removed this file completely it will still be loaded when necessary.
/app/assets/javascripts/application.js
// This is a manifest file that'll be compiled into including all the files listed below.
// Add new JavaScript/Coffee code in separate files in this directory and they'll automatically
// be included in the compiled file accessible from http://example.com/assets/application.js
// It's not advisable to add code directly here, but if you do, it'll appear at the bottom of the
// the compiled file.
//
//= require jquery
//= require jquery_ujs
//= require pages
We can do something similar for Mercury’s stylesheet but we won’t do that here.
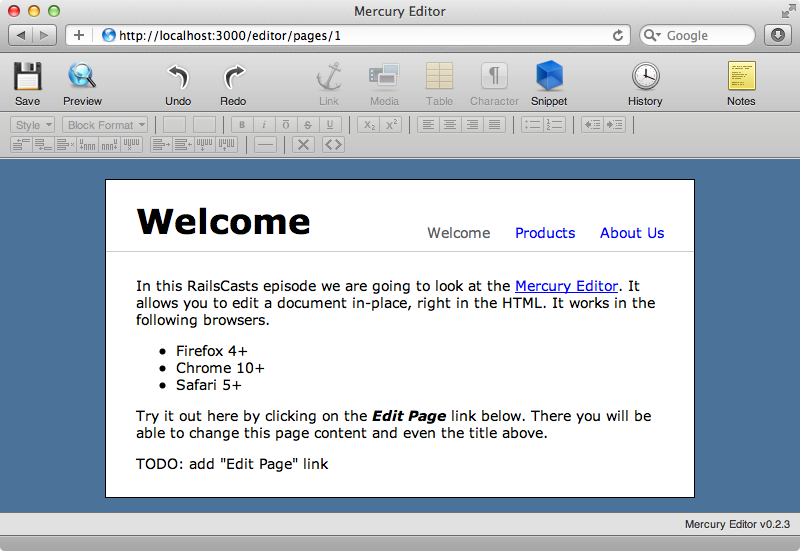
Making Pages Editable
With Mercury installed we now have access to the Mercury editor from any page in our application. To put any page into edit mode we just need to add /editor between the URL’s host and path.
Now that we know the URL to edit a page we can add the “Edit Page” link.
/app/views/pages/show.html.erb
<div id="header">
  <h1><%= raw @page.name %></h1>
  <ul id="navigation">
  <% Page.all.each do |page| %>
    <li><%= link_to_unless_current page.name, page %></li>
  <% end %>
  </ul>
</div>
<div class="content">
  <%= raw @page.content %>
  <p><%= link_to "Edit Page", "/editor" + request.path %></p>
</div>
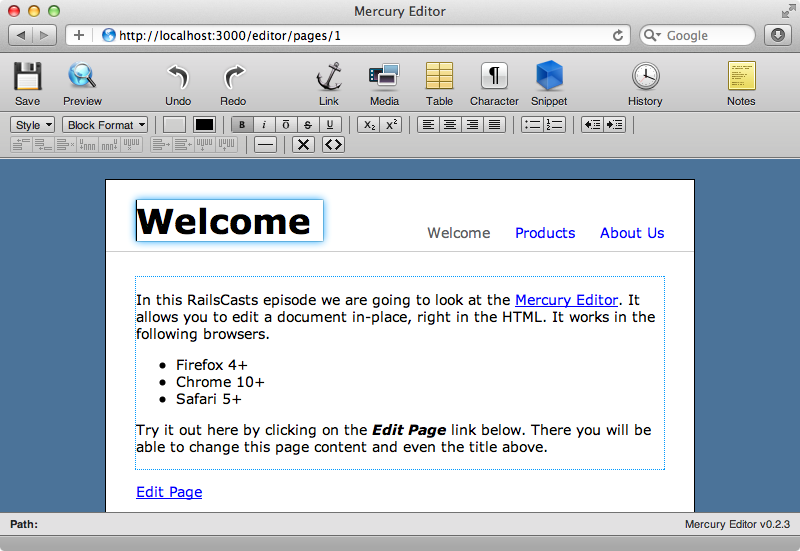
Adding Editable Areas
We now have a link to edit any page but we haven’t yet defined any editable areas on the page. There are two sections we want to be editable: the page’s title and its content and each of these map to attributes in the Page model. To make part of a page editable we need to wrap it in an element that has a class of mercury-region and a data-type of editable. We also need to give each wrapper element an id so that we can identify it when the updated page is sent back to the server. We’ll call our two regions page_name and page_content.
/app/views/pages/show.html.erb
<div id="header">
  <h1><span id="page_name" class="mercury-region" data-type="editable"><%= raw @page.name %></span></h1>
  <ul id="navigation">
  <% Page.all.each do |page| %>
    <li><%= link_to_unless_current page.name, page %></li>
  <% end %>
  </ul>
</div>
<div class="content">
  <div id="page_content" class="mercury-region" data-type="editable">
    <%= raw @page.content %>
  </div>
  <p><%= link_to "Edit Page", "/editor" + request.path %></p>
</div>
When we reload the page now we’l see the two editable regions outlined in blue.
Saving Changes
We can edit the two regions as much as we like now and preview our changes but we can’t save any changes we make as we haven’t yet set up our application to be able to do that. When we click the “Save” icon Mercury will pop up an alert showing where it was trying to save the changes to.
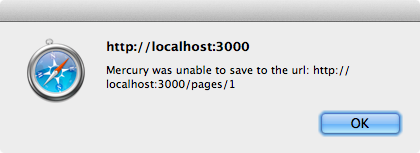
The URL that Mercury tries to save to is the page’s URL. Mercury sends a POST request to this URL containing the changes. We’ll change this so that the updated content is sent to a new mercury_update action on the PagesController. We’ll need to modify the routes file so that it knows how to handle this new action.
/config/routes.rb
Cms::Application.routes.draw do
  Mercury::Engine.routes
  root to: 'pages#index'
  resources :pages do
    member { post :mercury_update }
  end
end
Note that Mercury has added its own line to the routes file to enable the editor URL for each page.
Next we’ll write the new mercury_update action. This will need to find a page by its id then update it and return a response. For now we’ll just put a placeholder comment where the update code will go.
/app/controllers/pages_controller.rb
def mercury_update
  page = Page.find(params[:id])
  # Update page
  render text: ""
end
Now we need to tell Mercury that we’re not using its default URL for updating edited pages. Rather than hard-code this in JavaScript we’ll define it in a data attribute it the “Edit Page” link. We’ll also give the link an id now so that we can access it from JavaScript.
/app/views/pages/show.html.erb
<p><%= link_to "Edit Page", "/editor" + request.path, id: "edit_link", data: { save_url: mercury_update_page_path(@page) } %></p>
We can tell Mercury about this URL at the bottom of the mercury.js configuration file by adding the following code.
/app/assets/javascripts/mercury.js
$(window).bind('mercury:ready', function() {
  var link = $('#mercury_iframe').contents().find('#edit_link');
  Mercury.saveURL = link.data('save-url');
  link.hide();
});
This code binds to the mercury:ready event and when that event fires it finds the “Edit Page” link and sets Mercury’s saveURL to the value in the data-save-url attribute we added to it. Mercury loads the content of the current page into an iframe so we have to fetch its contents and find the link through there. As this code is triggered when the page is put into edit mode we’ll add a line to hide the “Edit Page” link here, too.
When we make some changes to the page now and try to save them the error message no longer shows which means that Mercury has submitted them to the server. If we look in the development log we’ll see that saving the page triggers the mercury_update action and that it has submitted a JSON string containing all the attributes necessary to update our Page model.
Started POST "/pages/1/mercury_update" for 127.0.0.1 at 2011-11-10 18:31:59 +0000
  Processing by PagesController#mercury_update as JSON
  Parameters: {"content"=>"{\"page_name\":{\"type\":\"editable\",\"value\":\"Welcome!!\",\"snippets\":{}},\"page_content\":{\"type\":\"editable\",\"value\":\"<p>In this ASCIIcasts episode we are going to look at the <a href=\\\"http://jejacks0n.github.com/mercury/\\\">Mercury Editor</a>. It allows you to edit a document in-place, right in the HTML. It works in the following browsers.</p>\\n<ul>\\n  <li>Firefox 4+</li>\\n  <li>Chrome 10+</li>\\n  <li>Safari 5+</li>\\n</ul>\\n<p>Try it out here by clicking on the <strong><em>Edit Page</em></strong> link below. There you will be able to change this page content and even the title above.</p>\",\"snippets\":{}}}", "id"=>"1"}
Mercury has the option to save the data as nested form parameters instead of by using JSON. To set this option we need to modify the mercury.html.erb file that was generated when we ran the Mercury generator. This file contains an options object with a saveStyle property. By default this property has a value of null which means that JSON will be used when a page update is sent back to the server. We’ll change this to 'form'.
/app/views/layouts/mercury.html.erb
<script type="text/javascript">
  var saveUrl = null;
  var options = {
    saveStyle: 'form',  // 'form', or 'json' (default json)
    saveMethod: null, // 'POST', or 'PUT', (create, vs. update -- default POST)
    visible: null     // if the interface should start visible or not (default true)
  };
  new Mercury.PageEditor(saveUrl, options);
</script>
When we save the changes to a page now they’re sent as nested parameters rather than as JSON data and we can use this data to save the changes to the database. The page’s name and content are both nested under the content parameter and each of these has a value property. We need these to save the page’s new content back to the database.
/app/controllers/pages_controller.rb
def mercury_update
  page = Page.find(params[:id])
  page.name = params[:content][:page_name][:value]
  page.content = params[:content][:page_content][:value]
  page.save!
  render text: ""
end
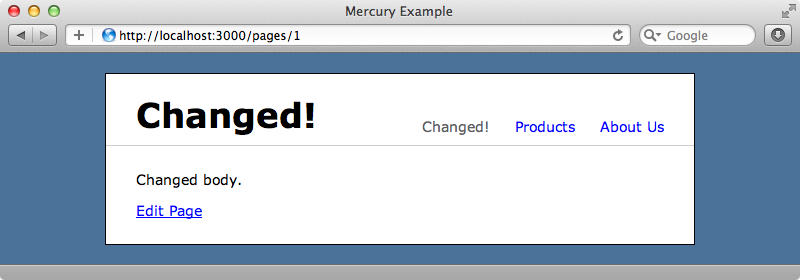
When we change the page now and save the changes nothing appears to happen but when we go back to the page we’ll see that the changes have been saved.
We want our application to redirect back to the page once we’ve saved the changes and we can do that by listening for the mercury:saved event and redirecting when it fires.
/app/assets/javascripts/mercury.js
$(window).bind('mercury:saved', function() {
  window.location = window.location.href.replace(/\/editor\//i, '/');
});
Now when we save changes we’re redirected back to the page itself.
Going Further
There’s much more to Mercury than we can cover here. Reading through the comments in the mercury.js file will give you a good idea as to what is possible. For example we can customize exactly what appears in the toolbar; there are various features like snippets, history and notes that we can enable and a whole lot more. All of these are documented in mercury.js.
That’s it for our look at Mercury. It’s a great project and a lot of fun to use. If you want to add it to one of your Rails projects, though, bear in mind that you’ll need a modern version of Firefox, Chrome or Safari to use it.