
250: Authentication from Scratch
(view original Railscast)
Other translations:


Almost every Rails application has some need for authentication. For password-based authentication the four most common libraries are Authlogic, Devise, Restful Authentication and Clearance, but which one should you use? Authlogic and Resful Authentication haven’t been updated for several months which leaves Devise and Clearance. Both of these are Rails engines which means that add controllers and views to your application that handle the authentication for you. For something as central to your application as authentication engines can be less than perfect as you can end up overwriting much of the functionality that’s provided in the controller and view layers. In these cases engines lose their benefits and can make your application more complicated overall.
Engines definitely have their place and there’s no reason not to keep using them but you might want to consider the alternatives. Generators can be a better fit for authentication than engines, all the code is there in your application and therefore it’s easier to customize. For example Ryan Bates’ Nifty Generators includes a generator for authentication which provides some simple code to get you started with password-based authentication in your application. But this episode isn’t about Nifty Authentication, instead we’ll show you how to create password-based authentication from scratch. This way when you do use an engine or a generator you’ll have a better idea as to what’s going on under the bonnet.
Getting Started
Since we’re creating the authentication from scratch we’ll start by creating a new Rails 3 application that we’ll call auth.
$ rails new auth
We’ll then cd into the new auth directory and get started by creating the sign-up process. We’re going to need a controller for creating users and so we’ll create a UsersController and give it a new action.
$ rails g controller users new
We’ll need a User model to go with the controller in order to store the users’ email addresses and passwords. For obvious reasons we should never store passwords as plain text so instead we’ll store a password hash and a salt.
$ rails g model user email:string password_hash:string password_salt:string
Now we’ve created the model we’ll migrate the database to create the users table.
$ rake db:migrate
Next we’ll write the code for the new and create actions in the UsersController.
/app/controllers/users_controller.rb
class UsersController < ApplicationController
  def new
    @user = User.new
  end
  def create
    @user = User.new(params[:user])
    if @user.save
      redirect_to root_url, :notice => "Signed up!"
    else
      render "new"
    end
  end
end
This is fairly standard controller code. In the new action we create a new User while in the create action we create a new User based on the parameters that are passed in (these will come from a form) . If that new User is valid then we redirect to the home page (which we don’t have yet), otherwise we render the new action template again.
We’ll write that new template now. It will have a form that has email, password and password_confirmation fields along with some code for showing any validation errors.
/app/views/users/new.html.erb
<h1>Sign Up</h1>
<%= form_for @user do |f| %>
  <% if @user.errors.any? %>
    <div class="error_messages">
      <h2>Form is invalid</h2>
      <ul>
        <% for message in @user.errors.full_messages %>
          <li><%= message %></li>
        <% end %>
      </ul>
    </div>
  <% end %>
  <p>
    <%= f.label :email %><br />
    <%= f.text_field :email %>
  </p>
  <p>
    <%= f.label :password %><br />
    <%= f.password_field :password %>
  </p>
  <p>
    <%= f.label :password_confirmation %>
    <%= f.password_field :password_confirmation %>
  </p>
  <p class="button"><%= f.submit %></p>
<% end %>
Our User model doesn’t have password or password_confirmation attributes but we’ll be making accessor methods inside the User model to handle these.
We’ll make a couple of changes to the routes file next. The controller generator has generated the following route.
get "users/new"
We’ll change this route to /sign_up, have it point to users#new and give it a name of "sign_up". We’ll also create a root route that points to the signup form. Finally we’ll add a users resource so that the create action works.
/config/routes.rb
Auth::Application.routes.draw do
  get "sign_up" => "users#new", :as => "sign_up"
  root :to => "users#new"
  resources :users
end
If we start up the server now and visit the signup form we’ll see an error message.
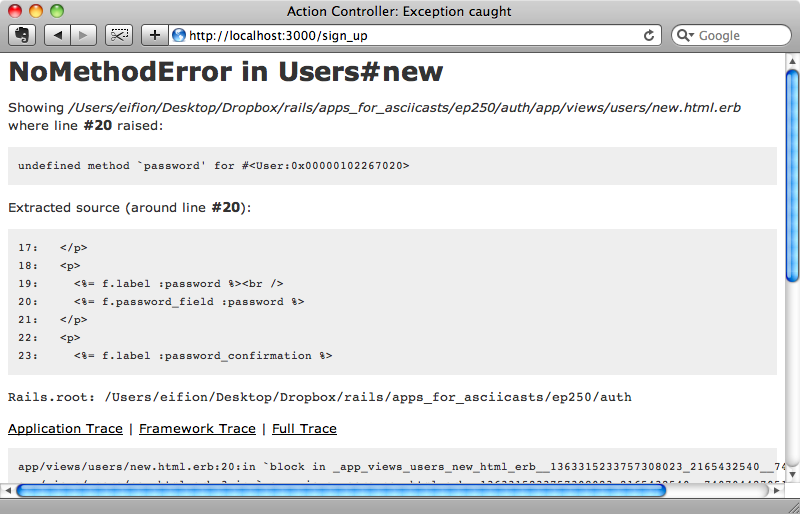
We get this error because we have a password field on the form for a User but no matching field in the database and therefore no password attribute in the User model. We’ll create that attribute in the model now along with an attribute to handle the password_confirmation field. For password_confirmation we can use validates_confirmation_of which will also check that the password and the validation match. Now is also a good item to add some other validation to the form to check for the presence of the email address and password and also the uniqueness of the password.
/app/models/user.rb
class User < ActiveRecord::Base
  attr_accessor :password
  validates_confirmation_of :password
  validates_presence_of :password, :on => :create
  validates_presence_of :email
  validates_uniqueness_of :email
end
When we created the User model we created password_hash and password_salt fields in the database to hold the encrypted version of the password. When the form is submitted we’ll have to encrypt the value in the password field and store the resulting hash and salt in those two fields. A good way to encrypt passwords is to use bcrypt and we’ll use the bcrypt-ruby gem to do this in our application. First we’ll add a reference to the gem in the Gemfile and then run the bundle command to make sure that the gem is installed.
/Gemfile
source 'http://rubygems.org'
gem 'rails', '3.0.3'
gem 'sqlite3-ruby', :require => 'sqlite3'
gem 'bcrypt-ruby', :require => 'bcrypt'
Next we’ll modify the User model so that it encrypts the password before it’s saved. We’ll do this by using a before_save callback that will calls a method called encrypt_password that we’ll write soon. This method will check that the password is present and if it is it will generate the salt and hash using two BCrypt::Engine methods, generate_salt and hash_secret.
/app/models/user.rb
class User < ActiveRecord::Base
  attr_accessor :password
  before_save :encrypt_password
  validates_confirmation_of :password
  validates_presence_of :password, :on => :create
  validates_presence_of :email
  validates_uniqueness_of :email
  def encrypt_password
    if password.present?
      self.password_salt = BCrypt::Engine.generate_salt
      self.password_hash = BCrypt::Engine.hash_secret(password, password_salt)
    end
  end
end
Now when a user signs up the password_hash and password_salt will be stored in the database. If we visit the signup form now it works and if we fill in the form correctly we’ll be redirected to the home page. If we then look at the users table in the database we’ll see the new user listed with the encrypted password hash and salt.
$ rails dbconsole
SQLite version 3.6.12
Enter ".help" for instructions
Enter SQL statements terminated with a ";"
sqlite> .mode column
sqlite> .header on
sqlite> SELECT * FROM users;
id          email                  password_hash                                                 password_salt                  created_at                  updated_at
----------  ---------------------  ------------------------------------------------------------  -----------------------------  --------------------------  --------------------------
1           eifion@asciicasts.com  $2a$10$Jh./oyCeThSChUCY8Of6F.fiHP8m4gMkZNjUR3vsDgvupUPgumNs.  $2a$10$Jh./oyCeThSChUCY8Of6F.  2011-01-26 21:51:56.399518  2011-01-26 21:51:56.399518
Logging In
We’re halfway there now. Users can sign up but they can’t yet sign in. We’ll fix that now, creating a new controller called sessions that will handle to login form.
$ rails g controller sessions new
Inside the new view file that was generated we’ll create the form for signing in.
/app/views/sessions/new.html.erb
<h1>Log in</h1>
<%= form_tag sessions_path do %>
  <p>
    <%= label_tag :email %><br />
    <%= text_field_tag :email, params[:email] %>
  </p>
  <p>
    <%= label_tag :password %><br />
    <%= password_field_tag :password %>
  </p>
  <p class="button"><%= submit_tag %></p>
<% end %>
We use form_tag rather than form_for here as form_for implies that there’s a resource behind the form. We don’t have a Session model so this is not the case here. The form POSTs to sessions_path, which will be the SessionController’s create action. The form has two fields, one for the email address and one for the password.
We’ll need to make some changes to the routing here, too. We’ll replace the "sessions/new" route that was created by the generator with a named "log_in" route. We’ll also need to add resources :sessions so that the signup form works.
/config/routes.rb
Auth::Application.routes.draw do
  get "log_in" => "sessions#new", :as => "log_in"
  get "sign_up" => "users#new", :as => "sign_up"
  root :to => "users#new"
  resources :users
  resources :sessions
end
In the SessionsController we’ll need to write a create action to handle the authentication when a user signs in. In it we’ll need to authenticate the user and we’ll do this by calling a new class method in the User model. This method will return a User record if the user has been properly authenticated. If so we’ll store the user’s id in a session variable then redirect to to the home page, setting a flash notice so that the user knows they’ve logged in successfully. If the attempt fails then we’ll set a different flash message to say so and re-render the form. Note that we use flash.now here as we’re rendering a page rather than redirecting to another one.
/app/controllers/sessions_controller.rb
class SessionsController < ApplicationController
  def new
  end
  def create
    user = User.authenticate(params[:email], params[:password])
    if user
      session[:user_id] = user.id
      redirect_to root_url, :notice => "Logged in!"
    else
      flash.now.alert = "Invalid email or password"
      render "new"
    end
  end
end
Now we need to write the User.authenticate method. It will try to find a user by the email address that was passed in. If it finds one it will encrypt the password from the form the same way we did when the user signed up, using that user’s password_salt. If the hash from the password matches the stored hash then the password is correct and the user will be returned, otherwise it returns nil. The else statement isn’t really necessary in Ruby as nil is returned anyway but it’s added here for clarity.
/app/models/user.rb
def self.authenticate(email, password)
    user = find_by_email(email)
    if user && user.password_hash == BCrypt::Engine.hash_secret ↵
      (password, user.password_salt)
      user
    else
      nil
    end
  end
end
Before we test this out we’ll modify the application’s layout file so that the flash messages are shown.
/app/views/layouts/application.html.erb
<!DOCTYPE html>
<html>
<head>
  <title>Auth</title>
  <%= stylesheet_link_tag :all %>
  <%= javascript_include_tag :defaults %>
  <%= csrf_meta_tag %>
</head>
<body>
  <% flash.each do |name, msg| %>
    <%= content_tag :div, msg, :id => "flash#{name}" %>
  <% end %>
<%= yield %>
</body>
</html>
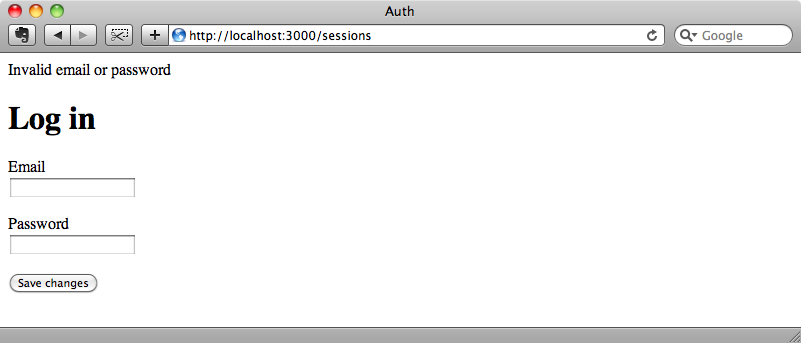
If we try to log in with an invalid username or password then we’ll see the login form again and now we’ll see the flash message telling us that our login was invalid.
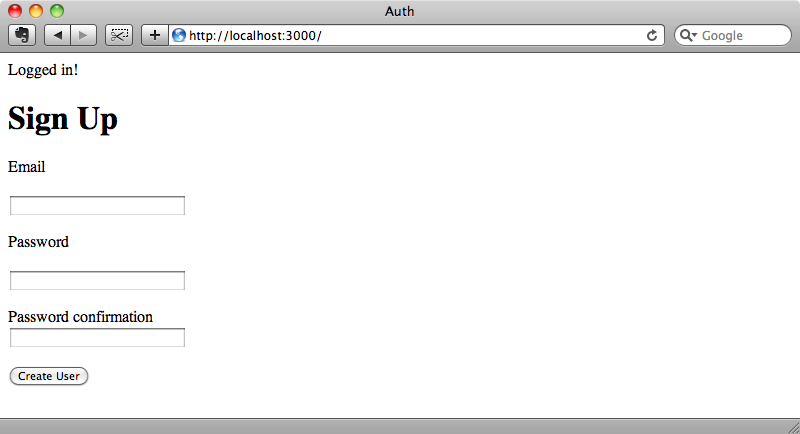
If we enter the correct login information we’ll be redirected to the home page and we’ll get a flash message telling us that we’ve logged in correctly.
Logging Out
This all works but we’ll need a way to log out as well. The first thing we’ll do to implement this is to addi a new route, "log_out".
/config/routes.rb
Auth::Application.routes.draw do
  get "log_in" => "sessions#new", :as => "log_in"
  get "log_out" => "sessions#destroy", :as => "log_out"
  get "sign_up" => "users#new", :as => "sign_up"
  root :to => "users#new"
  resources :users
  resources :sessions
end
This route points to the SessionsController’s destroy action. This action will log the user out by removing the user_id session variable and then redirecting to the home page.
/app/controllers/sessions_controller.rb
def destroy
  session[:user_id] = nil
  redirect_to root_url, :notice => "Logged out!"
end
We can try this out by visiting /log_out. When we do we’ll be redirected back to the home page and we’ll see the “Logged out!” flash message.

Adding Links
Instead of having to type URLs into the address bar to log in and out it would be much better if we had links on each page to do this. We can do this by adding the following code to the layout file just before the code that displays the flash messages.
/app/views/layouts/application.html.erb
<div id="user_nav">
  <% if current_user %>
    Logged in as <%= current_user.email %>
    <%= link_to "Log out", log_out_path %>
  <% else %>
    <%= link_to "Sign up", sign_up_path %> or
    <%= link_to "Log in", log_in_path %>
  <% end %>
</div>
We don’t have a current_user method yet so we’ll write one now. We’ll put in the ApplicationController.
/app/controllers/application_controller.rb
class ApplicationController < ActionController::Base
  protect_from_forgery
  helper_method :current_user
  private
  def current_user
    @current_user ||= User.find(session[:user_id]) if ↵
      session[:user_id]
  end
end
The current_user method gets the current user by its id, using the id from the session variable, and caches the result in an instance variable. We’ll make it a helper method too so that we can use it in the application’s view code.
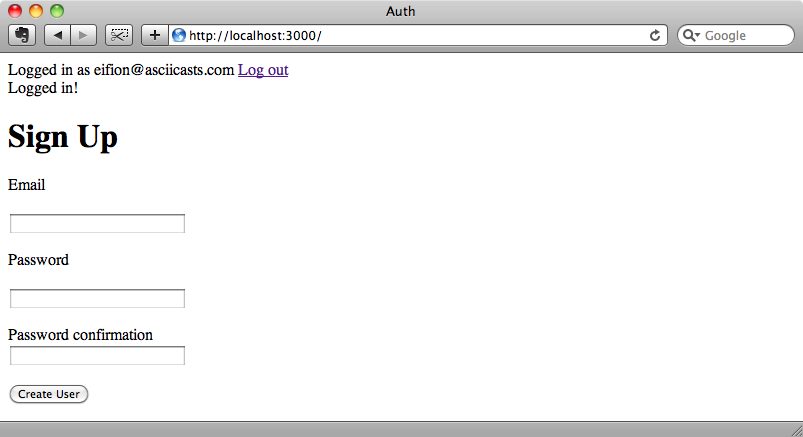
When we reload the page now we’ll see the “sign up” and “log in” links and if we sign in then we’ll see the login information along with a logout link.
We now have a fully-functional authentication system. We’ve covered a lot of code in this episode, most of which is in the controller and view layers. All of the authentication logic happens in the User model, mainly in the self.authenticate and encrypt_password methods and this code is quite simple.
If you want to build your own authentication from scratch instead of using an engine then password authentication isn’t that complicated and you can customize your controllers and views exactly how you want to suit your application. What we’ve shown here is pretty much the bare minimum. In a production application we’d want to add more validation in the User model such as validations for the password length and the email format.
One thing that is important to add to the User model is some code to restrict the attributes that can be set by mass assignment. We can do so by adding an attr_accessor to the User model.
/app/models/user.rb
class User < ActiveRecord::Base
  attr_accessible :email, :password, :password_confirmation
  #rest of code omitted
end
This way we can stop anyone from trying to update the password_hash or any other fields in the User model other than those in the form.
That’s it for this episode. While the available authentication gems are perfectly good it’s good to know what’s going on under the bonnet in normal password authentication. If you want to provide third-party authentication in addition to the password-based authentication then take a look at episode 241 [watch, read] on Simple OmniAuth.