
222: Rack in Rails 3
(view original Railscast)
Other translations:


Routing in Rails 3 was covered fairly extensively back in episode 203 [watch, read], but there are some advanced features that really show off the flexibility of Rails 3’s router and we’ll show you some of these in this episode.
Routing To Rack Applications
We’ll start off with a simple example. Our sample application has one route that points its root URL to the HomeController’s index action.
/config/routes.rb
Store::Application.routes.draw do |map|
  root :to => "home#index"
end
The important thing to know about the string "home#index" is that it is a shortcut provided for convenience. Behind the scenes the string is converted into this:
HomeController.action(:index)
This action method returns a Rack application and having the router able to handle Rack apps gives it its flexibility as it’s easy to get a Rack application from any Rails controller. To demonstrate this we’ll quickly create a simple Rack application by passing in the environment hash to a new proc object and return an array with a status code, an (empty) hash of headers and some simple body content.
/config.routes.rb
Store::Application.routes.draw do |map|
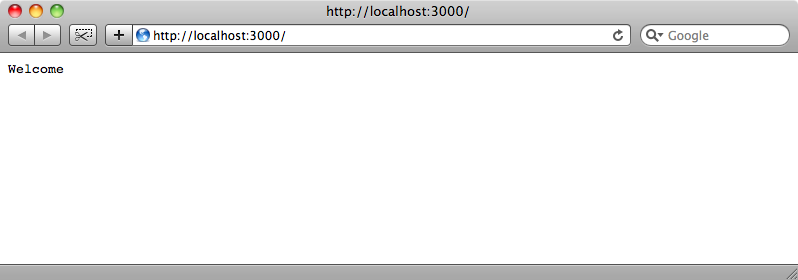
root :to => proc { |env| [200, {}, ["Welcome"]] }
end
If we visit our application’s root URL we’ll see that returned response.
This flexibility means that it’s easy to integrate any Rack-based application into a Rails application, and we’ll demonstrate that now by adding Sinatra to it.
We’ll need to add a reference to the Sinatra gem in our Rails application’s Gemfile.
/Gemfile
gem 'sinatra'
Then, to make sure the gem is installed we’ll run
bundle install
Now we can make our Sinatra application. We’ll create it in the /lib directory and call it home_app.rb. We need to create a class that inherits from Sinatra::Base and give it a get method for the root URL that returns a string.
/lib/home_app.rb
class HomeApp < Sinatra::Base
  get "/" do
    "Hello from Sinatra"
  end
end
Now we can update the routes file so that the root route points to our Rack application HomeApp.
/config/routes.rb
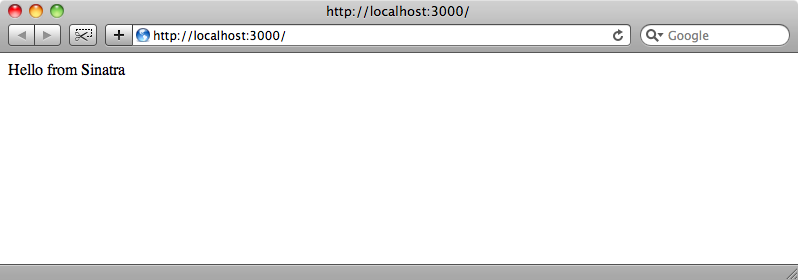
Store::Application.routes.draw do |map|
  root :to => HomeApp
end
If we reload the application’s home page now we’ll see the response from the Sinatra application.
Redirecting
As you can see, Rails 3 really embraces Rack. One of the benefits of this is the new redirect method and we’ll show you how that works now. Let’s say that our application has a route for an about page with the URL /about and which goes to the InfoController’s about action.
/config/routes.rb
Store::Application.routes.draw do |map|
  root :to => HomeApp
  match "/about" => "info#about"
end
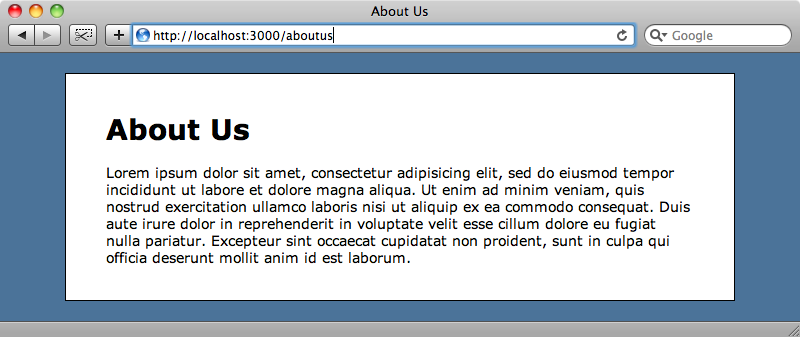
If we want to change the URL from /about to /aboutus we could easily alter the route but we’d be left with a legacy route that no longer points anywhere. Fortunately it’s easy to do redirects in Rails 3 using the redirect method.
/config/routes.rb
Store::Application.routes.draw do |map|
  root :to => HomeApp
  match "/about" => redirect("/aboutus")
  match "/aboutus" => "info#about"
end
With the new route and redirect in place the new route will work and the old route will redirect to the new one. If we visit the /about URL then we’ll be redirected to /aboutus.
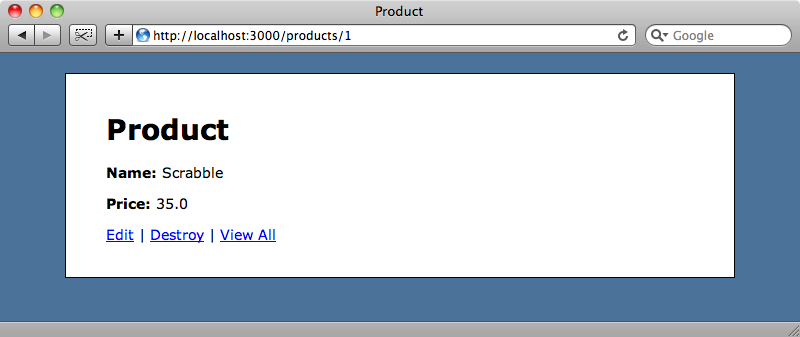
Next we’ll demonstrate a slightly more complicated way to use redirect. Let’s say we have a ProductsController and we want to have a shortcut URL of the form /p/:id to each product. To do this we can modify the routes file like this:
/config/routes.rb
Store::Application.routes.draw do |map|
  get "info/about"
  root :to => HomeApp
  match "/about" => redirect("/aboutus")
  match "/aboutus" => "info#about"
  resources :products
  match "/p/:id" => redirect("/products/%{id}")
end
The shortcut route for a product is the last route in the file. It redirects from the shortcut URL to the usual URL to a product. It does this by using the redirect method again but this time it redirects to a dynamic URL. To add the product’s id into the redirect URL we need to use a percent sign followed by the id wrapped in curly brackets. This will insert the id parameter into the redirect URL.
If we try to visit http://localhost:3000/p/1 now we’ll be redirected to the page for that product.
If we need more control over how the redirect happens then we can pass a block to the redirect method but we won’t cover that here. There are details on how to do this on the rails.info site.
Rails Metal
Back in episode 150 we covered Rails Metal [watch, read] and created a page that listed the processes running on our machine. In Rails 3 the technique is substantially different but is much easier to use thanks to the Rack integration. To duplicate what we did in that episode is pretty simple. First we’ll create the new route and point it to a new Rack application called ProcessesApp.
/config/routes.rb
match "/processes" => ProcessesApp
We’ll create this new application in the /lib directory and call it processes_app.rb. The class will have a class method called call that takes an environment hash. In it we’ll run the same command as we did in Episode 150 and return the result.
/lib/processes_app.rb
class ProcessesApp
  def self.call(env)
    [200, {}, [`ps -axcr -o "pid,pcpu, pmem, time, comm"`]]
  end
end
If we go to the processes page in the browser we’ll see the process list and if we reload the page we’ll see that it reloads very quickly as it’s using a simple Rack application.
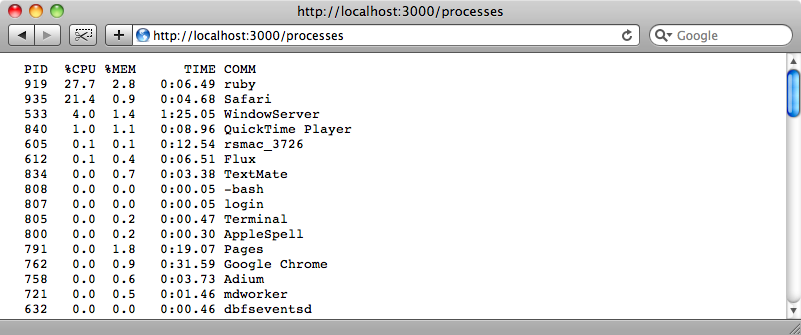
There’s nothing clever happening in the ProcessApp class. All we’re doing there is creating a simple Rack application but in a few lines of code we have reproduced the behaviour from Episode 150 in a much simpler way.
We don’t have any control over how the processes page looks as the response has no templates. We can, however, expand our Rack application so it pulls in parts of a Rails controller which will allow it to use templates and make the page less plain.
To give the processes page the ability to render an erb template rather than just returning the raw output from the ps command we just need to make the ProcessesApp class inherit from ActionController::Metal. This will pull in some controller behaviour from our Rails application, but at a lower level so we need to include the ActionController::Rendering module to get all of the behaviour we want.
As the controller we’re using acts at a lower level than a normal Rails controller we have to specify the view path which we do by calling the append_view_path method and passing it the route to the views folder for our application. This will make the controller look for its templates in the same folder as a normal controller would.
We want the controller to have an index action so we’ve replaced the self.call method with an index method that makes the same call to ps we had before, but which assigns the output to an instance variable. The method then calls render so that the template is rendered. Unlike a normal Rails controller, the template is not automatically rendered.
/lib/processes_app.rb
class ProcessesApp < ActionController::Metal
  include ActionController::Rendering
  append_view_path "#{Rails.root}/app/views"
  def index
    @processes = `ps -axcr -o "pid,pcpu, pmem, time, comm"`
    render
  end
end
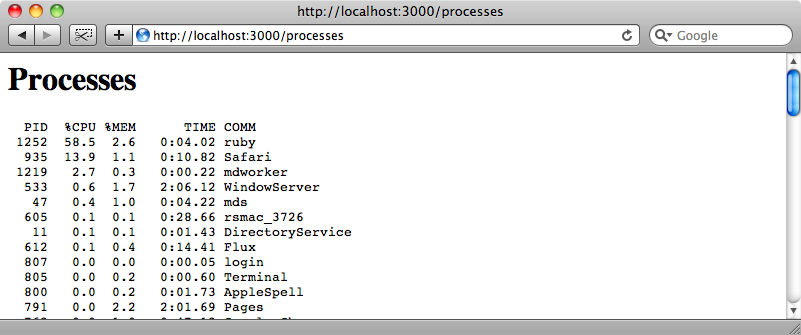
Now we’ll need to create the template. In our application’s views directory we’ll need to create a process_app directory in which we can put our new template. We can put any template code we want into this file just like we would with a normal erb template.
/app/views/processes_app/index.html.erb
<h1>Processes</h1>
<pre><%= @processes %></pre>
We’re nearly there now. All we need is to modify the route slightly so that it points to that specific action.
/config/routes.rb
match "/processes" => ProcessesApp.action(:index)
When we restart the server and visit the processes page again we’ll see that the page is now using our template.
As we’ve demonstrated Rails 3 is very modular and allows us to pull in exactly what we want from a controller into a custom Rack application. Bear in mind that writing a controller this way will only save a few milliseconds per request at best so it’s best to create a normal Rails controller first and run some performance tests against it before writing a Rack application as we have in this episode.