
304: OmniAuth Identity
(view original Railscast)
OmniAuth recently reached version 1.0 and has a number of nice additions. In this episode we’ll take a look at a new strategy called OmniAuth Identity which allows users to create an account by supplying a user name and password instead of logging in through an external provider.
How Our Application Currently Works
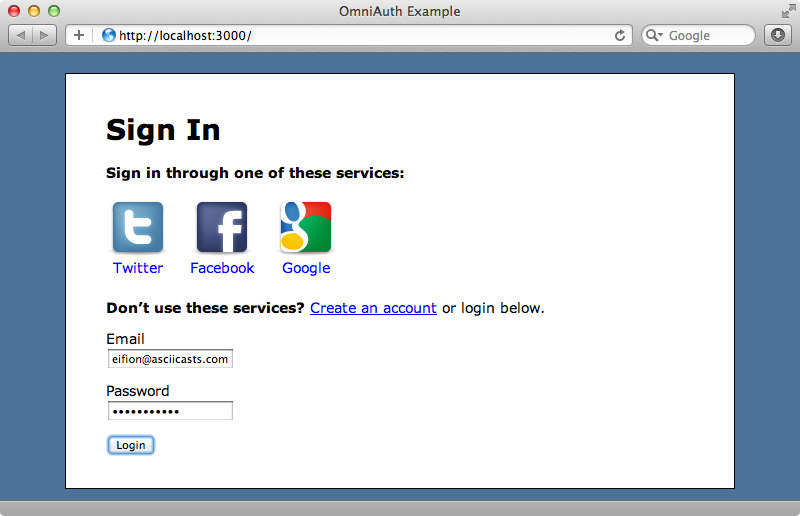
Below is a screenshot from the application we’ll be working with. We already have OmniAuth set up with three external providers.
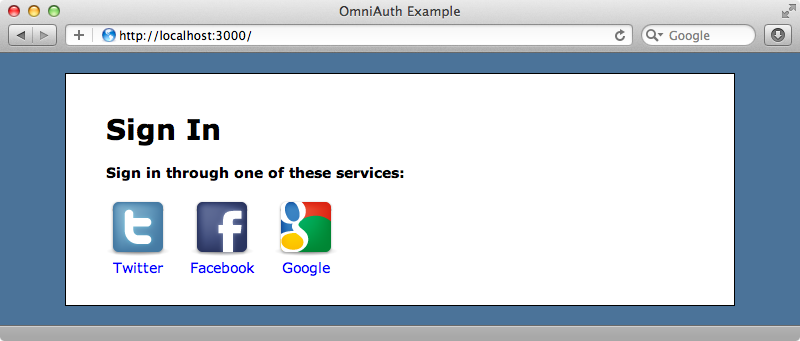
If we sign in through one of these providers, say Twitter, we’ll be redirected to Twitter’s website and asked if we want to authorize the application to access our Twitter account details. If we agree the application will grab our profile information from Twitter and we’ll be signed in.
Once we’ve authorized this application we won’t need to do it again and we can log in to our application through Twitter by just clicking the icon on the home page.
This is a convenient way of allowing users to sign in to but we’re excluding those who don’t want to sign in through one of these services. We should give these users the option of creating an account with a password directly in the site and this is where OmniAuth Identity comes in.
Before we do this we’ll walk through some of the application’s code to give you an idea of how it works. The source code is based on the application from episode 241 and if you’re unfamiliar with OmniAuth it’s worth taking a look at that episode first.
Since episode 241 was written there have been some changes to OmniAuth and one of the most significant is in the gemfile. Each provider now has a separate gem for OmniAuth so it’s necessary to include the right gem for each provider we want to support.
/Gemfile
gem 'omniauth-twitter'
gem 'omniauth-facebook'
gem 'omniauth-google-oauth2'
OmniAuth’s initializer looks much the same as it did before. In it we add OmniAuth as middleware and add a provider for each provider we want to use.
/config/initializers/omniauth.rb
Rails.application.config.middleware.use OmniAuth::Builder do
  provider :twitter, ENV['TWITTER_KEY'], ENV['TWITTER_SECRET']
  provider :google_oauth2, ENV['GOOGLE_KEY'], ENV['GOOGLE_SECRET']
  provider :facebook, ENV['FACEBOOK_ID'], ENV['FACEBOOK_SECRET']
end
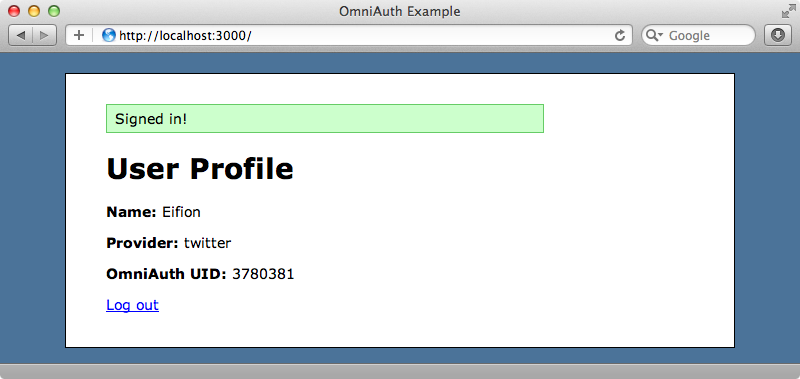
The application has a SessionsController whose create action is triggered as the OmniAuth callback. In it we create a user based on the OmniAuth hash and store that new user’s id in a session variable.
/app/controllers/sessions_controller.rb
class SessionsController < ApplicationController
  def new
  end
  def create
    user = User.from_omniauth(env["omniauth.auth"])
    session[:user_id] = user.id
    redirect_to root_url, notice: "Signed in!"
  end
  def destroy
    session[:user_id] = nil
    redirect_to root_url, notice: "Signed out!"
  end
  def failure
    redirect_to root_url, alert: "Authentication failed, please try again."
  end
end
The user is fetched from OmniAuth in a from_omniauth method in the User model.
/app/models/user.rb
class User < ActiveRecord::Base
  def self.from_omniauth(auth)
    find_by_provider_and_uid(auth["provider"], auth["uid"]) || create_with_omniauth(auth)
  end
  def self.create_with_omniauth(auth)
    create! do |user|
      user.provider = auth["provider"]
      user.uid = auth["uid"]
      user.name = auth["info"]["name"]
    end
  end
end
This method first checks to see if a user with the selected provider and user id exists. If so that user is returned, if not a create_with_omniauth method is called which creates that new user based on information from the OmniAuth hash that’s passed in. There’s one change to note in the hash. The info parameter was called user_info in earlier versions so if you’re upgrading an application to use OmniAuth 1.0 your code may break.
Adding OmniAuth Identity to an Application
That’s all the code that’s necessary to handle authentication through OmniAuth. Next we’ll add OmniAuth Identity so that users can create an account without having to use an external authentication service. As we mentioned earlier each OmniAuth provider requires a separate gem so the first thing we’ll need to do is add the omniauth-identity gem to the gemfile.
/Gemfile
# To use ActiveModel has_secure_password
gem 'bcrypt-ruby', '~> 3.0.0'
gem 'omniauth-twitter'
gem 'omniauth-facebook'
gem 'omniauth-google-oauth2'
gem 'omniauth-identity'
This gem relies on bcrypt-ruby for password hashing, but it’s not a dependency so it’s necessary to add bcrypt-ruby to the gemfile as well. There should be a comment in the gemfile that we can uncomment to add this gem. As ever we’ll need to run bundle to make sure all the gems are installed.
Next we’ll need to go to OmniAuth’s initializer and add the identity provider. We don’t need to add any parameters to this provider for now.
/config/initializers/omniauth.rb
Rails.application.config.middleware.use OmniAuth::Builder do
  provider :twitter, ENV['TWITTER_KEY'], ENV['TWITTER_SECRET']
  provider :google_oauth2, ENV['GOOGLE_KEY'], ENV['GOOGLE_SECRET']
  provider :facebook, ENV['FACEBOOK_ID'], ENV['FACEBOOK_SECRET']
  provider :identity
end
We’ll need a model to store login information. By default this model should be called identity, but we can customize this if we need to. We’ll need to give it name, email and password_digest fields.
$ rails g model identity name:string email:string password_digest:string
We’ll need to migrate the database to add the table.
$ rake db:migrate
OmniAuth Identity’s README shows us what we need to do to get the Identity model to work with various ORMs, including ActiveRecord. We’ll need to change the model so that it inherits from OmniAuth::Identity::Models::ActiveRecord instead of ActiveRecord::Base.
/app/models/identity.rb
class Identity < OmniAuth::Identity::Models::ActiveRecord
end
We’re almost done. All we need to do now is make a link to the new provider from the sign in page under the links for logging in through an external provider.
/app/views/sessions/new.html.erb
<p>
  <strong>Don’t use these services?</strong>
  <%= link_to "Create an account", "/auth/identity/register" %> or
  <%= link_to "login", "/auth/identity" %> with a password.
</p>
We need to restart the server for the changes to OmniAuth to be picked up. Once we have when we visit the sign-in page we’ll see new links for registering or logging in. First we’ll register a new account.
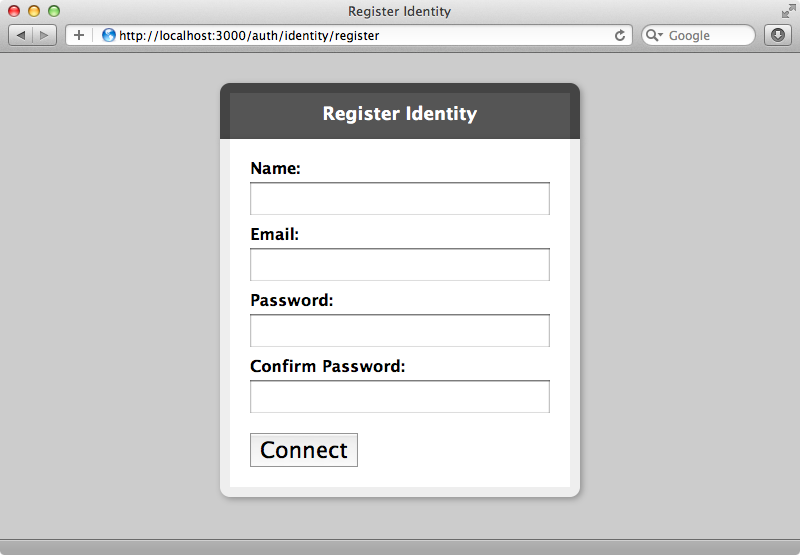
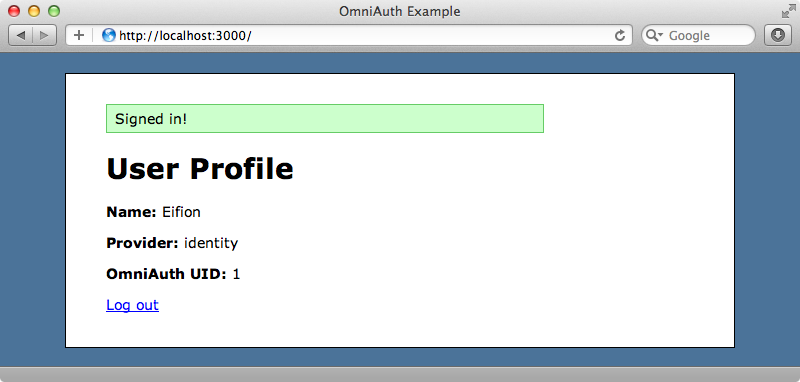
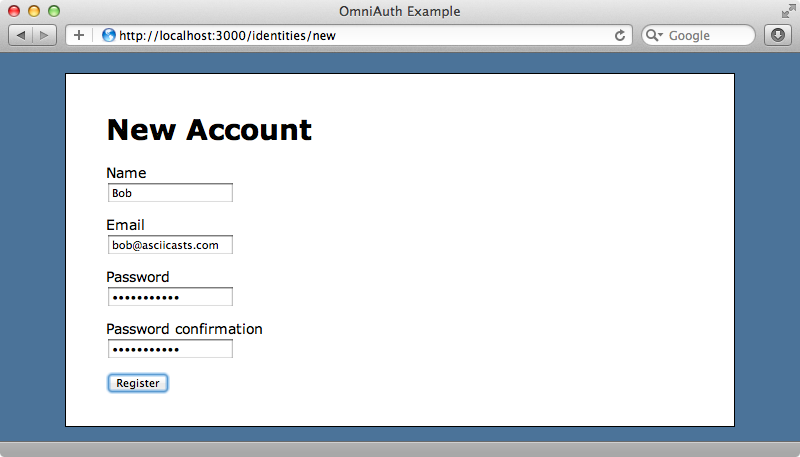
OmniAuth Identity provides a simple registration form with a clean interface and once we’ve filled it in correctly we’ll be signed in and taken to our profile page.
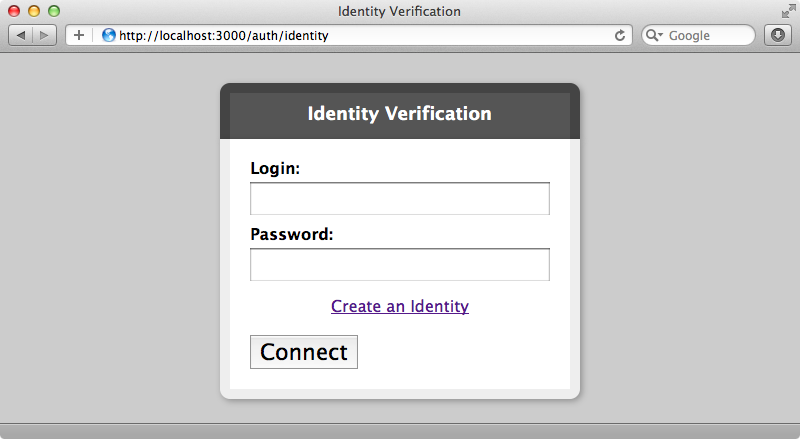
The login page looks similar, but has just two fields. The login field expects the email address we entered when we registered, though this isn’t obvious.
Creating Custom Registration and Login Forms
Registration and logging-in pretty much just work and because Identity uses the same OmniAuth interface as the code for the other providers we don’t have to change much of our core application to add this functionality. That said, there are a few pitfalls we should be aware of. If we have validations on our Identity model the user won’t see any errors if they fill in the form incorrectly. To demonstrate this we’ll add some validations to the Identity model now.
/app/models/identity.rb
class Identity < OmniAuth::Identity::Models::ActiveRecord
  validates_presence_of :name
  validates_uniqueness_of :email
  validates_format_of :email, :with => /^[-a-z0-9_+\.]+\@([-a-z0-9]+\.)+[a-z0-9]{2,4}$/i
end
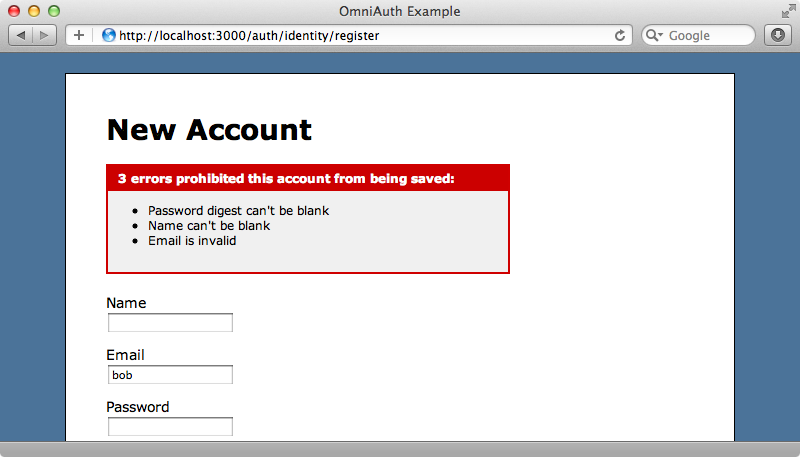
If we enter an invalid email address on the registration form now and try to register we’ll be taken back to the form with no indication of what we did wrong.
Similarly, the login form doesn’t make it clear that the “Login” field expects the user’s email address. There are options to customize the way this form looks but nothing particularly extensive. A better solution is to create our own custom forms in to the app itself to give us complete control over how they’re rendered and how they behave.
We’ll move the login form first. Instead of displaying a link to OmniAuth’s login form on the sign-in page we’ll show our custom login form.
/app/views/sessions/new.html.erb
<p>
  <strong>Don’t use these services?</strong>
  <%= link_to "Create an account", "/auth/identity/register" %> or login below.
</p>
<%= form_tag "/auth/identity/callback" do %>
  <div class="field">
    <%= label_tag :auth_key, "Email" %><br>
    <%= text_field_tag :auth_key %>
  </div>
  <div class="field">
    <%= label_tag :password %><br>
    <%= password_field_tag :password %>
  </div>
  <div class="actions"><%= submit_tag "Login" %></div>
<% end %>
This form POSTs to /auth/identity/callback which is where OmniAuth’s own form submits its data. We also give the form fields the same names they have on OmniAuth’s form. When we reload the sign in page now we have a login form and we can use it to enter our details and log in to the site just as we did with the other form.
We can take a similar approach to replacing the registration form, although we’ll need to create a new controller to do this.
$ rails g controller identities
We’ll treat this controller as a resource so we’ll modify the routes file to add it as such there.
/config/routes.rb
Auth::Application.routes.draw do
  root to: "sessions#new"
  match "/auth/:provider/callback", to: "sessions#create"
  match "/auth/failure", to: "sessions#failure"
  match "/logout", to: "sessions#destroy", :as => "logout"
  resources :identities
end
We’ll give the controller a new action. There’s a chance that if the validation for the registration form fails the identity object will be stored in a Rack environment variable so we’ll fetch it from there so that we can show any error messages on it.
/app/controllers/identities_controller.rb
class IdentitiesController < ApplicationController
  def new
    @identity = env['omniauth.identity']
  end
end
The associated template is fairly large but there’s nothing unusual in it.
app/views/identities/new.html.erb
<h1>New Account</h1>
<%= form_tag "/auth/identity/register" do %>
  <% if @identity && @identity.errors.any? %>
    <div class="error_messages">
      <h2><%= pluralize(@identity.errors.count, "error") %> prohibited this account from being saved:</h2>
      <ul>
      <% @identity.errors.full_messages.each do |msg| %>
        <li><%= msg %></li>
      <% end %>
      </ul>
    </div>
  <% end %>
  <div class="field">
    <%= label_tag :name %><br>
    <%= text_field_tag :name, @identity.try(:name) %>
  </div>
  <div class="field">
    <%= label_tag :email %><br>
    <%= text_field_tag :email, @identity.try(:email) %>
  </div>
  <div class="field">
    <%= label_tag :password %><br>
    <%= password_field_tag :password %>
  </div>
  <div class="field">
    <%= label_tag :password_confirmation %><br>
    <%= password_field_tag :password_confirmation %>
  </div>
  <div class="actions"><%= submit_tag "Register" %></div>
<% end %>
The form in this template POSTs to /auth/identity/register. At the top of the form we display any errors; below it are the same fields that OmniAuth’s registration form has. We populate the name and email fields if they exist in the current identity object.
We’ll need to alter the “Create an account” link on the sign in page so that it points to our new form instead of OmniAuth’s default.
/app/views/sessions/new.html.erb
<p>
  <strong>Don’t use these services?</strong>
  <%= link_to "Create an account", new_identity_path %> or login below.
</p>
When we click this link now we’ll be taken to our new form and we can use it to register a new account.
Our new form works well for creating new valid accounts but if we enter some invalid information then submit the form we’ll be redirected back to OmniAuth’s registration form. To fix this we’ll need to go to OmniAuth’s initializer file and modify the identity provider we added earlier.
/config/initializers/omniauth.rb
Rails.application.config.middleware.use OmniAuth::Builder do
  provider :twitter, ENV['TWITTER_KEY'], ENV['TWITTER_SECRET']
  provider :google_oauth2, ENV['GOOGLE_KEY'], ENV['GOOGLE_SECRET']
  provider :facebook, ENV['FACEBOOK_ID'], ENV['FACEBOOK_SECRET']
  provider :identity, on_failed_registration: lambda { |env|
    IdentitiesController.action(:new).call(env)
  }
end
The option we’ve added, on_failed_registration, takes a Rack application as an argument. We’ve set it to point to the new action in the IdentitiesController so that our new form is shown again. There’s an issue with calling this action directly: in development mode the action won’t always be reloaded so we’ve wrapped the code in a lambda to stop the action being cached.
We’ll need to start the Rails server for these changes to be picked up, but once we have the form will behave as we expect it to when we enter invalid information.
We now have OmniAuth identity working smoothly. Creating the custom forms took quite a bit of work but this is a still a nice solution if you’re already using OmniAuth and just need to add account registration.