
292: Virtual Machines with Vagrant
(view original Railscast)
Other translations:

As a Rails developer you’ll often find that your development environment is quite different from the production environment. Indeed it’s not unusual to develop an application on a different operating system from the one it will run on in production. Rails applications can also have a heavy set of dependencies that can be difficult to replicate across different machines.
Vagrant can help with this. It allows us to set up and manage virtual environments so we can set up a small Linux distribution inside our OS and run our application and all of its dependencies on a virtual machine that we can save to a portable package that we be easily shared with others.
Every Rails developer give Vagrant a try. At the least it will give you a better understanding of how to set up a production environment for your Rails apps. It’s also useful to use to set up a staging environment or even while developing an app.
Installing Virtual Box and Vagrant
Vagrant uses Oracle’s VirtualBox. If you don’t have it installed on your machine you’ll need to install it first. VirtualBox is available for Windows, OS X and Linux so whatever OS you’re running you should be able to find a suitable version. Once we’ve installed VirtualBox we can install Vagrant. This is a Ruby gem and we install it by running this command.
$ gem install vagrant
Adding a Box
The next step is to add a virtual machine, known as a box to Vagrant. There’s a long list of publicly available boxes at Vagrantbox.es and we can download one from there. We’ll use, ubuntu lucid 32, which is provided by the Vagrant site and which is based on Ubuntu Linux 10.04. To install the box we run vagrant box add, passing in a name and the URL of the box.
$ vagrant box add lucid32 http://files.vagrantup.com/lucid32.box
[vagrant] Downloading with Vagrant::Downloaders::HTTP...
[vagrant] Downloading box: http://files.vagrantup.com/lucid32.box
[vagrant] Extracting box...
[vagrant] Verifying box...
[vagrant] Cleaning up downloaded box...
Boxes can be fairly large (in the order of a few hundred megabytes) so they can take a while to download. If you’ve already downloaded one you can pass in a file URL instead to install from a local box file.
Once the box has downloaded and installed we can use it to set up our virtual environment. In Vagrant this is usually done for a specific project. We don’t have one so we’ll create a new one to work with, then move into its directory.
$ rails new todo
$ cd todo
We can create a virtual machine just for this application and its dependencies by running vagrant init and passing in the name of the box we want to use.
$ vagrant init lucid32
      create  Vagrantfile
All this command does is create a file called Vagrantfile. This file contains the configuration information for this application’s Vagrant box. By default all of the information is commented out, apart from the line that specifies which box to use.
/Vagrantfile
Vagrant::Config.run do |config|
  # All Vagrant configuration is done here. The most common configuration
  # options are documented and commented below. For a complete reference,
  # please see the online documentation at vagrantup.com.
  # Every Vagrant virtual environment requires a box to build off of.
  config.vm.box = "lucid32"
  # Rest of file omitted.
end
There are many other configuration options that we can specify here and its worth taking a minute to look through them all.
Starting up The Vagrant VM
Now it’s time for the magic. Running vagrant up will set up our virtual machine. This can take a few minutes but once it’s booted up we can SSH into it with
$ vagrant ssh
We’re now inside our Ubuntu virtual machine. This is a fairly barebones setup with very little installed on it, but there are a couple of things worthy of note. One is that it has a user called vagrant set up (and which we’re logged in as), the other is that we have sudo privileges that don’t require a password which is fine for our local development machine. Vagrant has also set up a shared directory at /vagrant that points to the directory where we have our Rails application.
Installing Our Application’s Dependencies
Our objective is to get our Rails application up and running on our virtual machine so we’re doing to have to set up its dependencies. First we’ll make sure we have Ruby and Sqlite installed. Our virtual machine already has Ruby 1.8.7 installed which has been done so that it can run Chef recipes.
Chef provides a way to automate server setup. To install Ruby 1.9 and Sqlite we could apply the necessary Chef recipes and they will be installed for us. Chef integrates nicely with Vagrant but it’s a big topic in itself and is something we’ll cover in a future episode. Instead we’ll set up our server without using Chef which will give us a better idea of how everything works together.
First we’ll use apt-get to make sure that all of our installed software is up to date.
$ sudo apt-get update
Once that has finished we’ll install some of the software we need: the build essentials, ZLib, Git and Sqlite3.
$ sudo apt-get install build-essential zlib1g-dev git-core sqlite3 libsqlite3-dev
All have left to install now is Ruby 1.9. We could install this from scratch or by using RVM but we’ll use something newer called rbenv. Using Vagrant means that we can experiment with tools such as this that we haven’t used before in a safe environment and, if we mess up, delete the virtual machine and start again.
To install rbenv in our virtual machine we just run the commands listed in section 2.1 of rbenv’s README. First we clone the repository into ~/.rbenv.
$ cd
$ git clone git://github.com/sstephenson/rbenv.git .rbenv
Next we add rbenv’s bin directory to our PATH and add the init command to our bash profile.
$ echo 'export PATH="$HOME/.rbenv/bin:$PATH"' >> ~/.bash_profile
$ echo 'eval "$(rbenv init -)"' >> ~/.bash_profile
We’ll have to reload the bash profile for these changes to take effect.
$ source .bash_profile
We now have an rbenv command that we can use to manage our Ruby versions but still no way to install Ruby. We’ll use Ruby Build to do this. All we need to do is clone its Git repository, then move into its directory and run its install script.
$ git clone sstephenson/ruby-build.git
$ cd ruby-build
$ sudo ./install.sh
We can now use rbenv to install the current version of Ruby 1.9.2.
$ rbenv install 1.9.2-p290
This will take a while to run but when it finishes it will have successfully compiled Ruby 1.9.2. We’ll need to run rbenv rehash when ever we change the binaries like this and then we’ll run this command to make 1.9.2 the default version of Ruby on our virtual machine.
$ rbenv global 1.9.2-p290
When we check our version of Ruby now it’s 1.9.2 just like we want.
$ ruby -v
ruby 1.9.2p290 (2011-07-09 revision 32553) [i686-linux]
Installing Our Rails Application
Now that we have the correct version of Ruby installed we can work on getting our Rails application working. If we move to the shared directory our application is in and run bundle to install its dependencies we’ll hit a problem.
vagrant@lucid32:~$ cd /vagrant/
vagrant@lucid32:/vagrant$ bundle
bundle: command not found
All we need to do to fix this is install the Bundler gem.
$ gem install bundler
Once this gem has installed we’ll need to run rbenv rehash again to set up the bundle executable. We can now run bundle to install our application’s gems.
If we try to start our application’s server now, it will throw a error complaining that it couldn’t find a JavaScript runtime. This makes sense as Rails 3.1 requires a JavaScript runtime and Ubuntu doesn’t have one by default. The quick solution to this is to add a gem called therubyracer to our application’s Gemfile and run bundle on our virtual machine. This will install the V8 JavaScript engine.
/Gemfile
gem 'therubyracer'
Once the gem has installed we can try running our server again.
$ bundle exec rails s
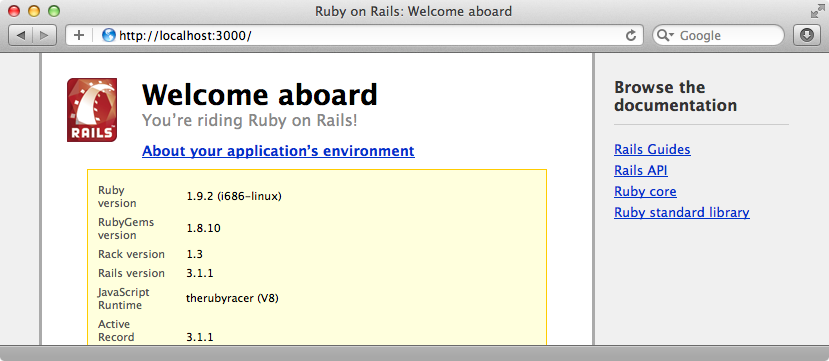
This time it starts successfully and our application is up and running on port 3000. We can’t view it in a browser, though, as it’s running on the virtual machine. We have to tell Vagrant to forward the port to our machine and we do this by modifying our project’s Vagrantfile. We need to uncomment the line below, change the name to something more suitable tell it to forward port 3000 on the virtual machine to the same port on our local machine.
/Vagrantfile
config.vm.forward_port "rails", 3000, 3000
Having changed the configuration we’ll need to exit out of our Vagrant shell by running exit in the VM and then reload the virtual machine by running vagrant reload. This will shutdown our virtual machine and then reload it. Once it’s reloaded we can SSH into it again.
$ vagrant ssh
Then on the virtual machine we can move to our application’s directory and start up the server again.
vagrant@lucid32:~$ cd /vagrant
vagrant@lucid32:/vagrant$ bundle exec rails s
This boots up the server again but we can now access it from our local machine.
As our Rails application is shared with Vagrant any changes we make to it will be reflected in our virtual machine. If we modify the default page at /public/index.html and reload the page the changes will be shown immediately.
/public/index.html
<h2>You’re riding Ruby on Rails on Vagrant!</h2>

Other Vagrant Commands
Vagrant provides a number of commands to help us manage our virtual machine. To get the current status of our VM we can run vagrant status.
$ vagrant status
Current VM states:
default                  running
The VM is running. To stop this VM, you can run `vagrant halt` to
shut it down forcefully, or you can run `vagrant suspend` to simply
suspend the virtual machine. In either case, to restart it again,
simply run `vagrant up`.
To temporarily stop and restart the machine we can use suspend and resume.
$ vagrant suspend
[default] Saving VM state and suspending execution...
$ vagrant resume
[default] Resuming suspended VM...
[default] Booting VM...
[default] Waiting for VM to boot. This can take a few minutes.
[default] VM booted and ready for use!
To complete shut down the VM we can use vagrant halt. We’ll then need to use vagrant up again to bring that machine back up.
One of the most useful commands is vagrant package. This will package up the virtual machine in its current state into a file called package.box. We can then share and distribute this file or use it to quickly recreate our virtual machine. If we use vagrant destroy to delete our virtual machine we can then restore it with the same vagrant box add command we used to set up our virtual machine in the first place.
That’s it for our episode on Vagrant. It’s a great solution for taking your Rails apps’ runtime dependencies and isolating them in a virtualized environment that can be packaged up and distributed among other developers, used to simulate the production server or used as a staging server. Vagrant becomes even more useful when used in combination with Chef and we’ll be covering that in a future episode.