
288: Billing With Stripe
(view original Railscast)
Other translations:

If you ever need to process credit card payments through your Rails applications you should take a look at Stripe. Stripe is a payment gateway that is easy to set up and which is very developer friendly. It only charges fees on a per-transaction basis and these are very reasonable. There are no monthly fees or other hidden costs. (By the way we’re not being paid to say this).
Stripe is currently only available in the United States so you’ll need an account at a U.S. bank if you want to use it in your applications. International support is being worked on, however, and should be available soon. This doesn’t mean that you can’t bill international customers, the only restriction is that the seller must be in the U.S.
Adding Stripe to a Rails Application
In this episode we’ll use Stripe to add recurring payments to a Rails application. The application we’ll use is a site that sells Llama Kisses. Why? Well Ryan Bates grew up on a llama ranch and missed out on the opportunity to sell llama kisses then so he’s making up for lost time now.
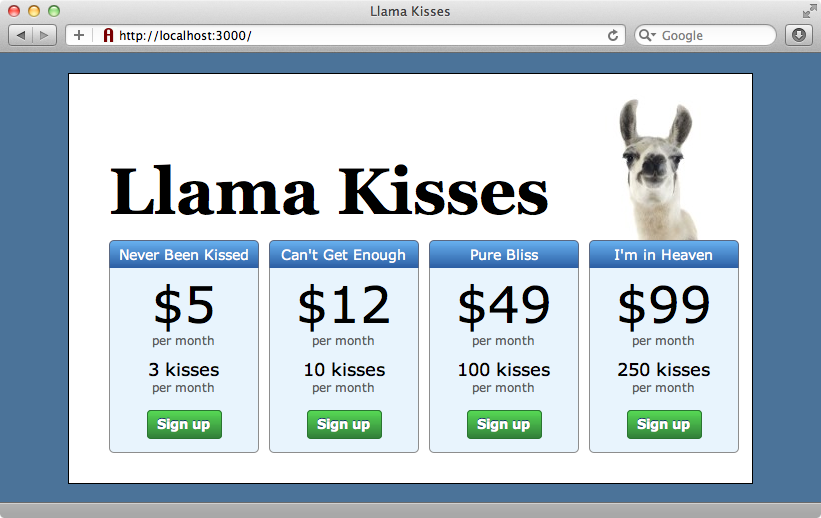
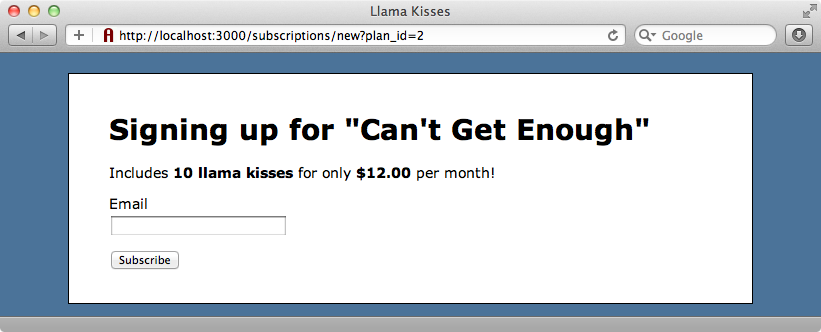
Most of the application is already written. There are four different plans and users can sign up for any one of them to create a subscription. There’s only an email field on the sign-up page right now and when we fill that field in and submit the form a new subscription will be created. So that we can take payments through Stripe we’ll add some more fields for credit card details.
Getting started with Stripe is easy. It we visit stripe.com and click the “Get Started with Stripe” button we’ll be taken to a page where we can process test transactions. We can also do this from the command line with curl. If we copy the example code from the “Getting Started” page and run it in a terminal window we should see some JSON returned.
$ curl https://api.stripe.com/v1/charges \
>   -u zVyGPfdmfhSGpHAxhFiJT7kFnHeSi9ZN: \
>   -d amount=100 \
>   -d currency=usd \
>   -d 'card[number]=4242424242424242' \
>   -d 'card[exp_month]=5' \
>   -d 'card[exp_year]=2012' \
>   -d 'description=test charge IFnFXZgdZk'
{
  "amount": 100,
  "created": 1318355241,
  "currency": "usd",
  "description": "test charge IFnFXZgdZk",
  "fee": 0,
  "id": "ch_oVfzHImv8sN5TV",
  "livemode": false,
  "object": "charge",
  "paid": true,
  "refunded": false,
  "card": {
    "country": "US",
    "exp_month": 5,
    "exp_year": 2012,
    "last4": "4242",
    "object": "card",
    "type": "Visa"
  }
}
Whether we run a test transaction through the site or through the terminal window the recent payments are shown in the dashboard at the bottom of Stripe’s management page.

Creating an account is easy; all we need to is enter an email address and a password on the management page. Once we’ve done that we can visit the page for our account where we’ll see, amongst other things, the API keys we’ll need to communicate with Stripe’s REST API. Stripe also provide a Ruby gem that makes using this API in Rails applications much easier. We’ll install this gem in our application now. As with most Ruby gems we do this by adding a reference to it the Gemfile and then running bundle.
/Gemfile
source 'http://rubygems.org'
gem 'rails', '3.1.1'
gem 'sqlite3'
# Gems used only for assets and not required
# in production environments by default.
group :assets do
  gem 'sass-rails',   '~> 3.1.4'
  gem 'coffee-rails', '~> 3.1.1'
  gem 'uglifier', '>= 1.0.3'
end
gem 'jquery-rails'
gem 'stripe'
Stripe needs two API keys so that it knows which account it’s working with. We’ll store these in a new stripe.rb initializer file in the application’s /config/initializers directory. The keys we need to store here are the secret test key that’s shown in our account page and the public API key here. We’ll store the public key in a constant as it isn’t used by the Ruby gem, only in views and JavaScript. This key should hold the value from the publishable test key on our Stripe account page.
/config/initializers/stripe.rb
Stripe.api_key = "5J7dr36JmNpLrXXFwAXChdRzZZwLyCHV"
STRIPE_PUBLIC_KEY = "pk_B1SaM15nXXruDU3g2D6uns2kJeu9m"
As this file contains sensitive information it’s a good idea to add it to the application’s .gitignore file so that it isn’t included in the repository. Also, as we’ll use different keys on the production site we don’t want this file being accidentally copied over to the production codebase.
Adding Stripe’s JavaScript and The API Key
When a user submits their credit card information in a form the credit card information goes directly to Stripe’s server and not to our application at all. This makes it a lot easier to get PCI compliance. If we look at the example form on Stripe’s API page we’ll see that none of its fields have a name attribute. This means that when the form is submitted these fields aren’t passed to our application’s server. Instead they’ll read by some JavaScript code that is triggered when a user submits the form.
To use Stripe in our application we need to include a JavaScript file from Stripe’s server. Then we set our publishable key and add some JavaScript that will fire when the form containing the credit card fields is submitted. This JavaScript will generate a token based on the credit card information from the form.
We’ll add Stripe’s JavaScript file in our application’s layout file. It needs to be placed before the application’s own JavaScript file. We could add some code that checks if the current page is the checkout page and only adds the script when this is the case, but we won’t do that here. We also need to make our public key available to JavaScript and we’ll do this the same way that Rails adds its CSRF key, in a meta tag in the head of the page.
/app/views/layouts/application.html.erb
<!DOCTYPE html>
<html>
<head>
  <title>Llama Kisses</title>
  <%= stylesheet_link_tag    "application" %>
  <%= javascript_include_tag "https://js.stripe.com/v1/", "application" %>
  <%= csrf_meta_tags %>
  <%= tag :meta, :name => "stripe-key", ↵
    :content => STRIPE_PUBLIC_KEY %>
</head>
<body>
  <!-- Body omitted -->
</body>
</html>
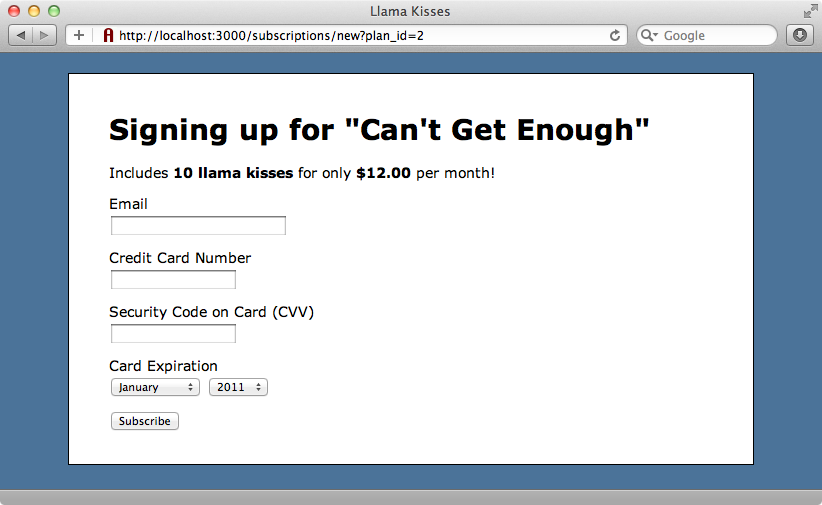
Adding Credit Card Fields To The Subscription Form
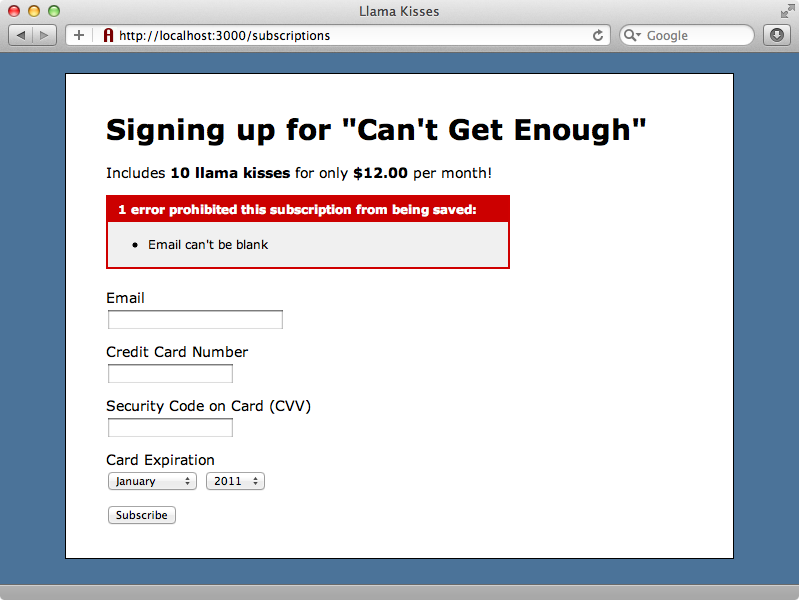
Next we’ll add the credit card fields to the subscription form. The form currently contains a hidden field that holds the id of the selected plan and a text field for an email address. We’ll add more fields for a credit card number, security code and expiration date.
/app/views/subscriptions/new.html.erb
<%= form_for @subscription do |f| %>
  <% if @subscription.errors.any? %>
    <div class="error_messages">
      <h2><%= pluralize(@subscription.errors.count, "error") %> prohibited this subscription from being saved:</h2>
      <ul>
      <% @subscription.errors.full_messages.each do |msg| %>
        <li><%= msg %></li>
      <% end %>
      </ul>
    </div>
  <% end %>
  <%= f.hidden_field :plan_id %>
  <div class="field">
    <%= f.label :email %>
    <%= f.text_field :email %>
  </div>
  <div class="field">
      <%= label_tag :card_number, "Credit Card Number " %>
      <%= text_field_tag :card_number, nil, name: nil %>
  </div>
  <div class="field">
      <%= label_tag :card_code, "Security Code on Card (CVV)" %>
      <%= text_field_tag :card_code, nil, name: nil %>
  </div>
  <div class="field">
    <%= label_tag :card_month, "Card Expiration" %>
    <%= select_month nil, {add_month_numbers_true: true}, {name: nil, id: "card_month"}%>
    <%= select_year nil, {start_year: Date.today.year, end_year: Date.today.year+15}, {name: nil, id: "card_year"}%>
  </div>
  <div class="actions"><%= f.submit "Subscribe" %></div>
<% end %>
We’ve added two text fields to the form, one for a credit card number, and one for the security code and also two dropdowns for the expiry date. There are a few things worth noting about the fields we’ve added. For the credit card name and security code we’ve used label_tag and text_field_tag instead of going through the form builder as these new fields aren’t attributes on our Subscription model. We don’t want them to be submitted back to the server at all so we’ve also specified a nil name for each field. Similarly for the expiry date fields we’re using select_month and select_year for the expiry date and specifying the id manually so that we don’t have to deal with the one that Rails generates.
When we reload the page the new fields are shown in the form.
Next we want to write the JavaScript that fires when the form is submitted. This script will submit the credit card information to Stripe and submit the token that it receives back from Stripe through the form. As our application is written in Rails 3.1 we’ll write this code in CoffeeScript in the subscriptions.js.coffee file.
/app/assets/javascripts/subscriptions.js.coffee
jQuery ->
  Stripe.setPublishableKey($('meta[name="stripe-key"]').attr('content'))
  subscription.setupForm()
subscription =
  setupForm: ->
    $('#new_subscription').submit ->
      $('input[type=submit]').attr('disabled', true)
      subscription.processCard()
  processCard: ->
    card =
      number: $('#card_number').val()
      cvc: $('#card_code').val()
      expMonth: $('#card_month').val()
      expYear: $('#card_year').val()
    Stripe.createToken(card, subscription.handleStripeResponse)
  handleStripeResponse: (status, response) ->
    if status == 200
      alert(response.id)
    else
	 alert(response.error.message)
This code should only run after the page’s DOM has loaded and so it’s all wrapped in the jQuery function. The first thing it does is set up Stripe by specifying the publishable key. The key’s value is read from the meta tag we added in the application’s layout file. We fetch it by looking for a meta tag with a name attribute that has a value of stripe and reading that tag’s content attribute. The rest of the logic is handled through a subscription object. This object has a function called setupForm that will do all of the work.
Next we create the subscription object and give it a setupForm function. In this function we get the subscription form by its id and add a callback that fires when the form’s submit event fires. When the form is submitted we disable the submit button to stop the it from being accidentally submitted again by setting the button’s disabled attribute to true. Then we call a processCard function and return false so that the form isn’t submitted.
The processCard function creates an object representing the credit card’s values in the format that Stripe expects and reads the appropriate values for each field from the form’s fields using val(). The next line is the important one. We call Stripe.createToken with two arguments. The first is the card object that we’ve just created (we can also pass in an optional amount here). The second is a function that will handle the response from Stripe, which happens asynchronously. We’ll pass in subscription.handleStripeResponse here.
The handleStripeResponse function takes two arguments: a status and a response. If the status has a value of 200 then the transaction succeeded and we’ll have a response token stored in response.id. For now we’ll just alert the response value so that we can see what it is. If the status isn’t 200 then an error has occurred so we’ll alert the error message.
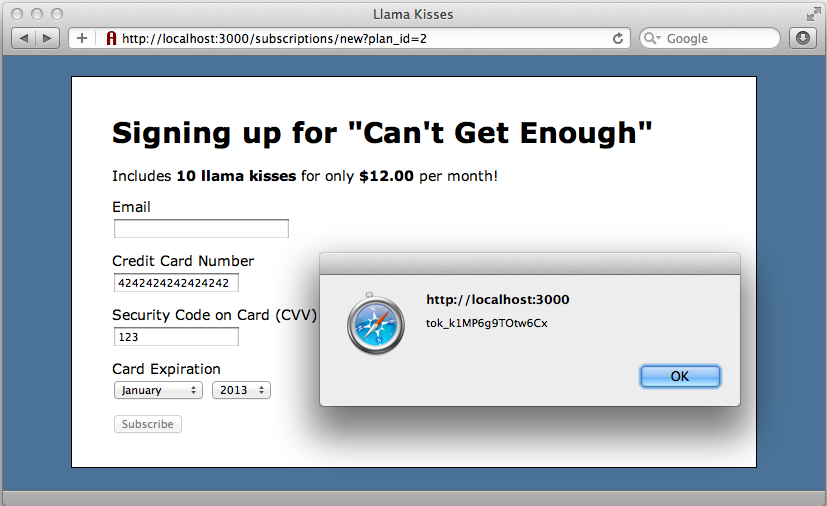
We can give our new form a try out now. If we reload the new subscription form and submit valid card details we get a response token back.
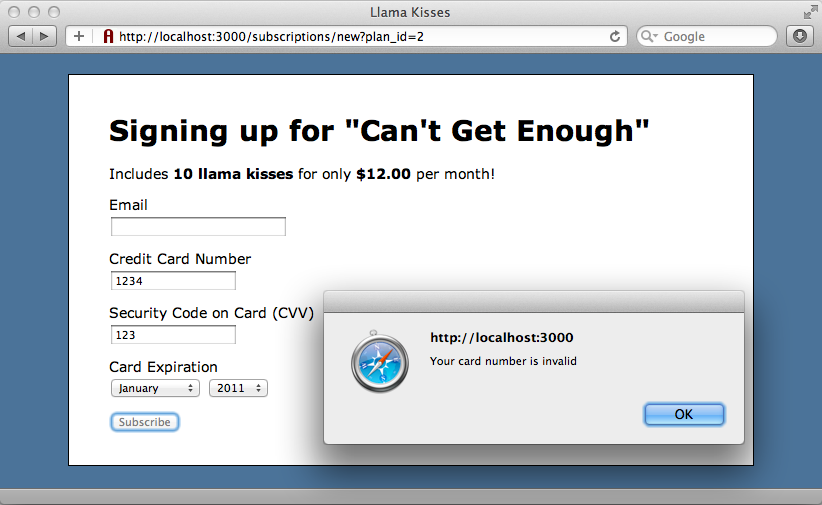
If we enter an invalid card number we’ll get an error message returned instead.
Handling The Response
Now that we know that the calls to Stripe are being processed correctly we’ll improve the code that handles the error messages. Instead of showing an alert we’ll show the error message on the page in a div with and id of stripe_error and re-enable the submit button so that the user can enter their details again.
/app/assets/javascripts/subscriptions.js.coffee
handleStripeResponse: (status, response) ->
  if status == 200
    alert(response.id)
  else
    $('#stripe_error').text(response.error.message)
    $('input[type=submit]').attr('disabled', false)
Having done this we’ll need to add the div to the view.
/app/views/subscriptions/new.html.erb
<%= form_for @subscription do |f| %>
  <!-- Form fields omitted -->
  <div id="stripe_error">
    <noscript>JavaScript is not enabled and is required for this form. First enable it in your web browser settings.</noscript>
  </div>
  <div class="actions"><%= f.submit "Subscribe" %></div>
<% end %>
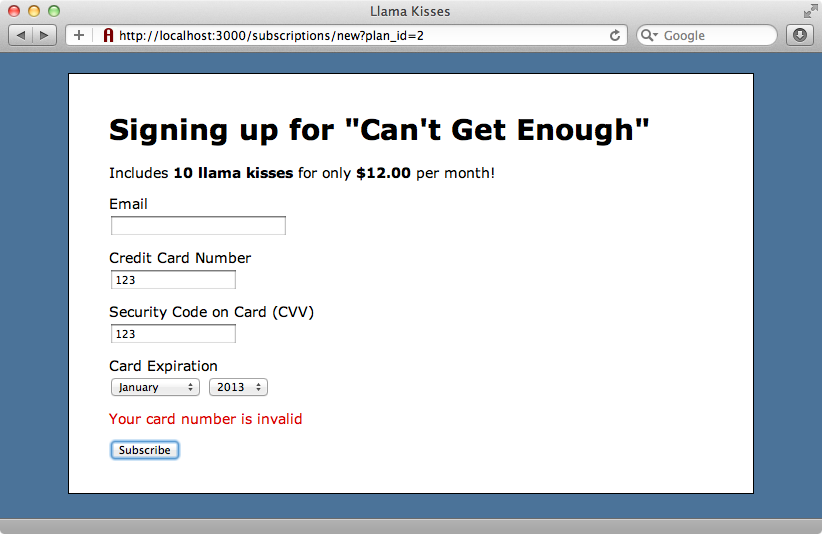
We’ve placed a noscript element in the div so that an error is shown if anyone tries to use the form in a browser that doesn’t have JavaScript enabled. When we reload the page and submit the form with an invalid credit card number again we’ll see the error message in the stripe_error div instead of an alert.
Next we’ll change the code that handles successful transactions. Instead of displaying the response token in an alert we’ll add it to a new hidden field in the form and then submit the form. We’ll add a new hidden field in the view and call it stripe_card_token.
/app/views/subscriptions/new.html.erb
<%= f.hidden_field :stripe_card_token %>
There’s no stripe_card_token field in the subscriptions table in the database so we’ll need to add this field as a virtual attribute in our Subscription model.
/app/models/subscription.rb
class Subscription < ActiveRecord::Base
  belongs_to :plan
  validates_presence_of :plan_id
  validates_presence_of :email
  attr_accessible :stripe_card_token
end
Back in our CoffeeScript file we’ll replace the alert with code that sets the value of our new hidden field to the value of the response token and then submits the form. We submit the form by calling submit directly on the form. Doing this bypasses the onsubmit callback so that the form is POSTed back to the server.
/app/assets/javascripts/subscriptions.js.coffee
handleStripeResponse: (status, response) ->
  if status == 200
    $('#subscription_stripe_card_token').val(response.id)
    $('#new_subscription')[0].submit()
  else
    $('#stripe_error').text(response.error.message)
    $('input[type=submit]').attr('disabled', false)
The form is submitted to the SubscriptionsController’s create action and the token will be passed in to a new Subscription. We could handle the payment through a before_create callback here but instead we’ll create a new method in the Subscription model called save_with_payment and do it there. Before we write this method we’ll replace the call to save with save_with_payment.
/app/controllers/subscription_controller.rb
def create
@subscription = Subscription.new(params[:subscription])
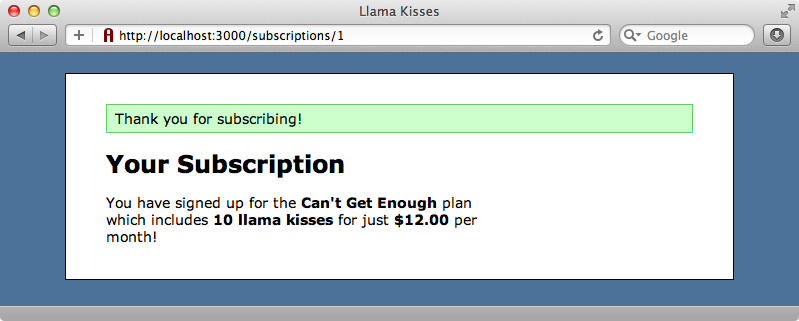
if @subscription.save_with_payment
redirect_to @subscription, :notice => "Thank you for ↵
subscribing!"
else
render :new
end
end
The save_with_payment method will use the stripe gem to handle the payment. We could use the response token to make a payment using the Stripe::Charge.create method but we don’t want to do this as the response token can only be used once and we want to make a recurring payment. Instead we’ll use the token to create a new Stripe::Customer. We can then assign a plan to that customer with recurring payments. Stripe will then automatically handle recurring payments for us. All of this is covered in Stripe’s excellent API documentation.
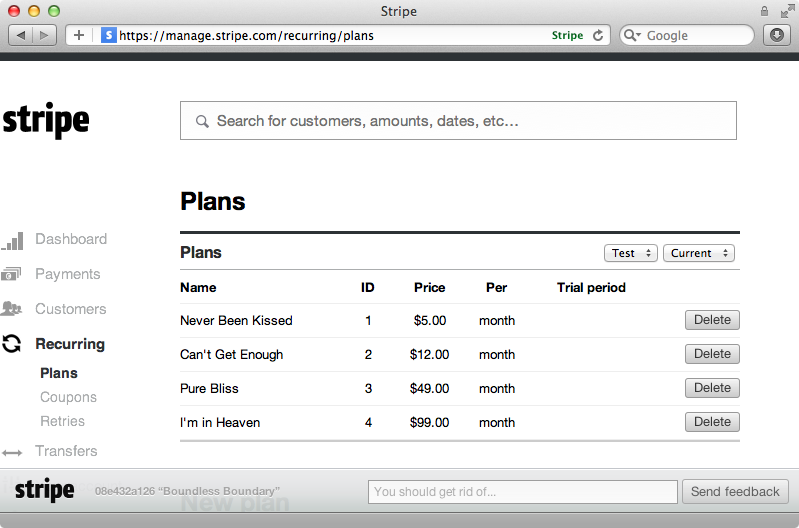
Before we make any changes to our Subscription model we’ll go to our Stripe account and set up some plans so that it knows how to handle our recurring payments. We’ll add four plans with names and ids that match the plans in our Rails application.
Back in our Subscription model we can now write the save_with_payment method.
/app/models/subscription.rb
class Subscription < ActiveRecord::Base
  belongs_to :plan
  validates_presence_of :plan_id
  validates_presence_of :email
  attr_accessor :stripe_card_token
  def save_with_payment
    if valid?
      customer = Stripe::Customer.create(description:email, ↵
        plan: plan_id, card: stripe_card_token)
      self.stripe_customer_token = customer.id
      save!
    end
  end
end
This method checks that the model is valid and if it is it will create a new Stripe::Customer, passing it the customer’s email address as a description, the plan_id and the stripe_card_token. Stripe will create a new id for the customer which we’ll need to save to the database. We’ll save it in to a new stripe_customer_token field. We’ll create a migration for this field then run rake db:migrate to add it to the database.
$ rails g migration add_stripe_to_subscriptions stripe_customer_token:string
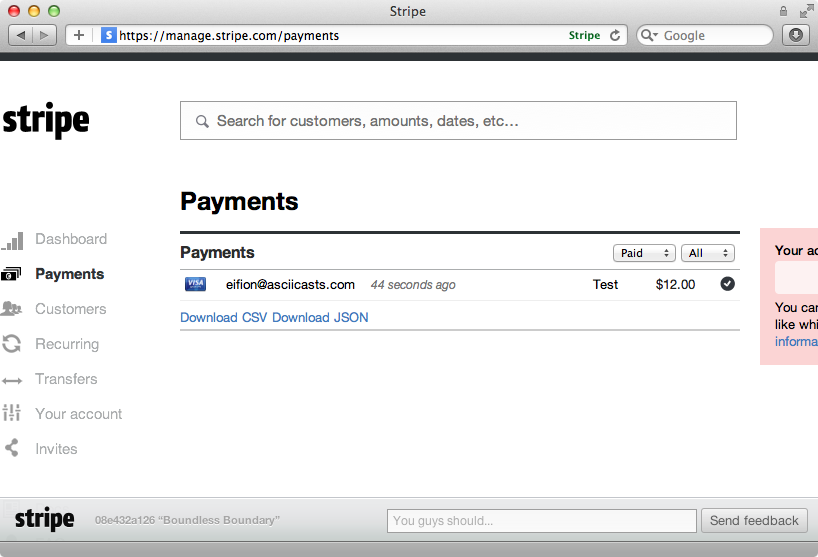
We’re ready now to test making a payment. If we go to the new subscription page, enter valid credit card details and click “Subscribe” the token and customer will be created in the background and the form will be submitted. If we visit the payments page for our Stripe account we’ll see the new payment listed for the price of the plan. This is a recurring payment and will be taken every month.
Handling Errors
The call to Stripe::Customer.create might raise an exception if some of the information passed isn’t valid. This can happen, for example, if a user submits the form without JavaScript enabled in their browser so that the stripe_card_token wasn’t generated. It’s a good idea to use rescue to handle these cases. Stripe will raise an InvalidRequestError in these cases and we can catch these, log them, add a validation error to the page and then show the form again.
/app/models/subscription.rb
def save_with_payment
  if valid?
    customer = Stripe::Customer.create(description:email, ↵
      plan: plan_id, card: stripe_card_token)
    self.stripe_customer_token = customer.id
    save!
  end
rescue Stripe::InvalidRequestError => e
  logger.error "Stripe error while creating customer: #{e.mesage}"
  errors.add :base, "There was a problem with your credit card."
end
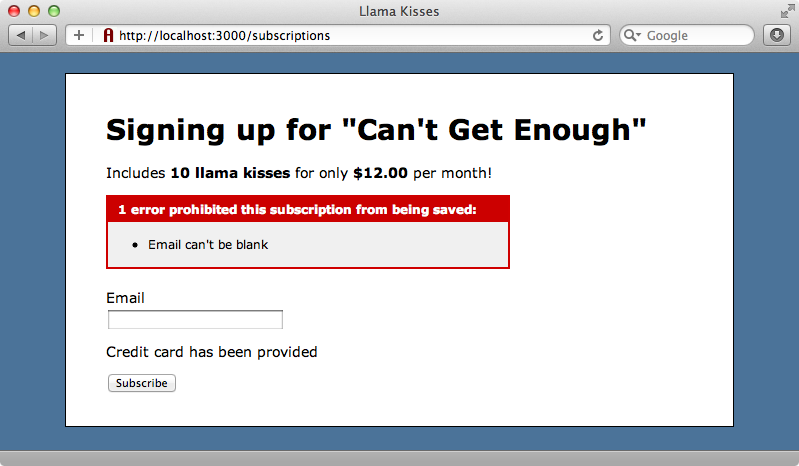
We also need to handle errors on form fields unrelated to credit card information, such as the email field on our form, better. Currently if we try to submit a subscription with no email address but with valid credit card details we’ll receive a proper token from Stripe but instead of being redirected to the page that shows a successful login we’ll be shown the form again with an email validation error.
In these cases we should hide the credit card fields as we already have a valid token. We can do this by modifying the view so that it hides the fields if a stripe_card_token exists for the subscription and shows a message instead.
/app/views/subscriptions/new.html.erb
<div class="field">
  <%= f.label :email %>
  <%= f.text_field :email %>
</div>
<% if @subscription.stripe_card_token %>
  Credit card has been provided
<% else %>
  <div class="field">
    <%= label_tag :card_number, "Credit Card Number " %>
    <%= text_field_tag :card_number, nil, name: nil %>
  </div>
  <div class="field">
    <%= label_tag :card_code, "Security Code on Card (CVV)" %>
    <%= text_field_tag :card_code, nil, name: nil %>
  </div>
  <div class="field">
    <%= label_tag :card_month, "Card Expiration" %>
    <%= select_month nil, {add_month_numbers_true: true}, ↵
      {name: nil, id: "card_month"}%>
    <%= select_year nil, {start_year: Date.today.year, ↵
      end_year: Date.today.year+15}, ↵
      {name: nil, id: "card_year"} %>
  </div>
</div>
<% end %>
We’ll also need to update the setupForm function in our subscriptions CoffeeScript file so that it doesn’t try to process the card again when a user submits the form in this case. We can do this by checking to see if the card number field exists on the form. If it doesn’t then it’s been hidden because the credit card information has already been processed. In this case we won’t process it again and we’ll return true so that the form is submitted.
/app/assets/javascripts/subscriptions.js.coffee
setupForm: ->
  $('#new_subscription').submit ->
    $('input[type=submit]').attr('disabled', true)
    if $('#card_number').length
      subscription.processCard()
      false
    else
      true
If we submit the form with valid credit card details but with a missing email address now the credit card fields will be hidden.
If we fill in the email field and submit the form again our subscription will be successful and the payment will be processed by Stripe.
WebHooks
One feature of Stripe that we haven’t covered is WebHooks. These allow us to provide a callback URL that Stripe will call when a given event fires. For example if a recurring payment fails we want to be told about this so that we can suspend that user’s account. We can then inform them so that they can update their credit card information. Speaking of which, our application still needs a way for users to update their card information, cancel their subscriptions and so on, but we won’t be covering that here.
Stripe has a number of features we haven’t covered in this episode, but hopefully we’ve given you enough to get started. Stripe is a great way to process credit card payments. Unfortunately it’s unavailable outside the U.S. for now, but international support is promised soon.