
282: Upgrading to Rails 3.1
(view original Railscast)
Other translations:


Rails 3.1 has finally been released. There’s a great overview of its new features in the Release Notes on the RailsGuides site some of which have been covered on the Railscasts site and also here. In this episode we’ll focus on upgrading a Rails 3.0 application to 3.1 and we’ll use the Railscasts site as our example.
Preparing The Site
Before we upgrade the site to Rails 3.1 we’ll need to take a few preparatory steps. If the site isn’t currently running the latest version of Rails 3.0, currently 3.0.10, we’ll need to update it. We can do this by setting the version in the Gemfile and then running bundle.
/Gemfile
gem "rails", "3.0.10"
Next we’ll run the application’s test suite to make sure that all of the tests still pass and that there are no deprecation errors. If there are then we’ll need to fix these before we continue. Everything passes in the Railscasts code so we can proceed with the upgrade.
Upgrading
We’re ready to start to upgrade the site now. We’ll do this inside a new Git branch that we’ll call rails31.
$ git checkout -b rails31
Upgrading to Rails 3.1 is pretty simple. We just need to go to our application’s Gemfile again and change the version number to whatever the latest release of 3.1 is, currently 3.1.0.
/Gemfile
gem "rails", "3.1.0"
Now we can run bundle update to install the new version. The only other change we need to make is to the development.rb configuration file where we need to remove or comment out the following line.
/config/development.rb
# config.action_view.debug_rjs = true
If we run our tests again now we’ll see that they all still pass. We can even start up the Rails server and see it running in the browser.
Modifying Our Application To Use The Asset Pipeline
The asset pipeline is one of Rails 3.1’s main new features but as our application still has its images, stylesheets and JavaScript files under the /public directory we’re not taking advantage of it at all. The asset pipeline is completely optional and doesn’t come into effect unless we enable it so if we’re not sure about using it this needn’t stop us from upgrading to Rails 3.1. Given how easy it is to upgrade this means that there’s very little reason not to.
If we do want to use the asset pipeline we have to enable it. To do this we have to add the following lines to the Gemfile. (These come from the Gemfile that is generated when we create a new Rails 3.1 application.)
/Gemfile
# Gems used only for assets and not required
# in production environments by default.
group :assets do
  gem 'sass-rails', " ~> 3.1.0"
  gem 'coffee-rails', " ~> 3.1.0"
  gem 'uglifier'
end
gem 'jquery-rails'
This code creates an assets group and puts some asset-related gems in it. It also includes the jquery-rails gem so that we can use jQuery. (If you prefer to use Prototype there’s a prototype-rails gem you can use instead.) We’ll also need to modify /config/application.rb, replacing this code:
/config/application.rb
# If you have a Gemfile, require the gems listed there, including any gems
# you've limited to :test, :development, or :production.
Bundler.require(:default, Rails.env) if defined?(Bundler)
with this:
/config/application.rb
if defined?(Bundler)
  # If you precompile assets before deploying to production,
    use this line
  Bundler.require *Rails.groups(:assets => %w(development test))
  # If you want your assets lazily compiled in production,
    use this line
  # Bundler.require(:default, :assets, Rails.env)
end
This code adds the assets group to the groups that are required by Bundler. We’ll need to enable the asset pipeline in this file, too, which we can do by adding these lines of code inside the Application class:
/config/application.rb
# Enable the asset pipeline
config.assets.enabled = true
# Version of your assets, change this if you want to expire all your assets
config.assets.version = '1.0'
This code enables the asset pipeline and also gives it a version number. This number can be changed when we want to expire the assets.
We also need to change the configuration settings in each environment’s configuration file. We’ll start with development.rb. We need to make a couple of changes here so that the assets aren’t compressed and to enable asset debugging.
/config/environments/development.rb
  # Do not compress assets
  config.assets.compress = false
  # Expands the lines which load the assets
  config.assets.debug = true
Next we’ll modify production.rb.
/config/environments/production.rb
# Compress JavaScript and CSS
config.assets.compress = true
# Don't fallback to assets pipeline
config.assets.compile = false
# Generate digests for assets URLs
config.assets.digest = true
In production mode we want to compress the assets, but we set compile to false so that it doesn’t fallback on to the asset pipeline if we’re going to precompile them. We also set digest to true so that the assets’ URLs are fingerprinted. We can, of course, configure these options differently to suit how our applications work in production mode.
Lastly we’ll modify the test environment. Here we add options so that static assets are served and cached and we also enable asset debugging.
/config/environments/test.rb
# Configure static asset server for tests with Cache-Control for performance
config.serve_static_assets = true
config.static_cache_control = "public, max-age=3600"
# Allow pass debug_assets=true as a query parameter to load pages with unpackaged assets
config.assets.allow_debugging = true
If we’re using Git for our application’s source control we should also modify the .gitignore file and add the .sass-cache directory to the list of ignored items. We don’t want the SASS cache in Git.
/.gitignore
.sass-cache/
Moving The Assets
Now that our asset pipeline is configured it’s time to create the app/assets directory. We can then move the images, javascripts and stylesheets directories from /public to /app/assets.
$ mkdir app/assets
$ mv public/images/ app/assets/
$ mv public/javascripts/ app/assets/
$ mv public/stylesheets/ app/assets/
Some of the files we’ve moved aren’t needed anymore, such as the jQuery-related files in the javascripts directory. These are included in the jQuery gem and so we can remove jquery.js, jquery.min.js, and rails.js. Now is also a good time to decide if we want to move some files such as jQuery plugins into /lib/assets or /vendor/assets, like we did in episode 279 [watch, read].
Next we’ll need to create the manifest files. This application already has application.js and application.css files in the relevant directories so we don’t need to create them. We’ll start with the CSS file. To turn it in into a manifest file we need to add some comments at the top that will tell Sprockets which files to include. (The Sprockets syntax was also covered back in episode 279). We’ll tell Sprockets to include the rest of the file itself and also all of the other files inside the stylesheets directory and its subdirectories.
/app/assets/stylesheets/application.css
/*
*= require_self
*= require_tree .
*/
/* rest of file omitted */
We can do the same to the application.js file, but we’ll need to do something a little different here as we want to include jQuery.
/app/assets/javascripts/application.js
//= require jquery
//= require jquery_ujs
//= require_self
//= require_tree .
/* rest of file omitted */
Again we add require_self here as the file itself contains code and also require_tree so that and other files under the same directory are included.
We’ll also need to go into the application’s layout file and change the lines that include the stylesheets and JavaScript files so that they each only reference the relevant application file, as the other files are included via the manifest.
/app/views/layouts/application.html.erb
<%= stylesheet_link_tag "application" %>
<%= javascript_include_tag "application", "http://cdn.sublimevideo.net/js/3s7oes9q.js" %>
The JavaScript files that the application needs include an external file which isn’t going to be included via the asset pipeline. This being the case we’ll still need to include it in the list of files above.
Now’s the time to try our application in the browser to make sure that our changes have all worked. Before we do we’ll run bundle again to install all of the gems that we added. After they’ve installed we can start up the server.
$ rails s
Everything mostly works but there are some broken images, for example the logo at the top of the screen.
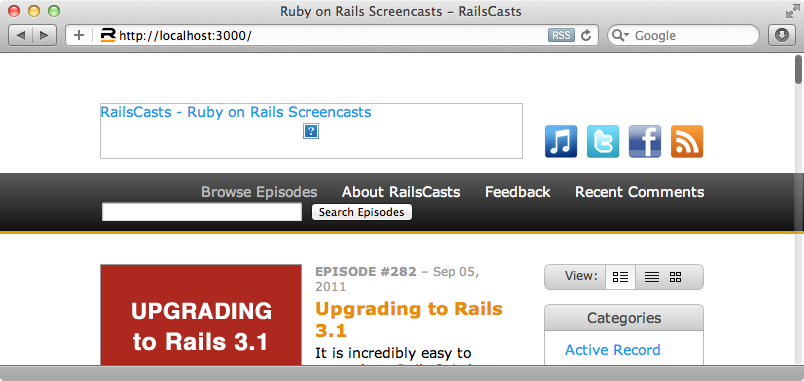
The problem with this is that the image’s URL has been hard-coded in the layout file.
/app/views/layouts/application.html.erb
<img src="/images/railscasts_logo.png" width="423" height="56" alt="RailsCasts = Ruby on Rails Screencasts"/>
This won’t work as our application’s images are no longer in the /public/images directory. The simplest solution might appear to be to change the image’s URL from /images/railscasts_logo.png to /assets/railscasts_logo.png and while this will appear to work in development mode we’ll run into issues in production. If we have the assets.digest option enabled this will add a hash at the end of the name and so a static reference to that file will no longer work. We should instead always use the helper methods. This will link the image correctly in both development and production mode.
/app/views/layouts/application.html.erb
<%= image_tag("railscasts_logo.png", :size => "423x56", :alt => "RailsCasts - Ruby on Rails Screencasts") %>
We’ll need to globally search through our application and change any statically-referenced assets so that they use the helper methods like the image above. If we reload the page now the image appears which means that our asset pipeline is now working correctly.
We’ve pretty much finished upgrading our application to Rails 3.1. There are some other new features you can take advantage of and it’s worth taking a look at the other episodes on Rails 3.1 to see if they would be useful in your applications.