
224: Controllers in Rails 3
(view original Railscast)
Other translations:


While most of the major changes to controllers in Rails 3 have happened behind the scenes there are some differences in the interface that we interact with as Rails developers. This episode will cover some of the new features that have been added.
Parameter Logging
The first change we’ll show is in the ApplicationController. In a Rails 2 application you can filter certain parameters from being shown in plain text in the log file by using the filter_parameter_logging method, as shown here:
/app/controllers/application_controller.rb
class ApplicationController < ActionController::Base
  protect_from_forgery
  filter_parameter_logging :password
end
This method has been deprecated in Rails 3 and should be removed. Parameter filtering is now configured in the /config/application.rb file. The code that configures the parameters that should be filtered is at the bottom of the file.
/config/application.rb
# Configure sensitive parameters which will be filtered from the log file.
config.filter_parameters += [:password]
This line is added by default in a new Rails 3 application. It’s easy to forget to add filtering into an application so it’s a nice feature to have installed by default. It will of course only filter password parameters as it stands and will need to be altered if other parameters such as credit card numbers need filtering too.
Redirect shortcuts
Next we’ll take a look at the ProductsController in a store application we’ve written and how redirects are handled when an action such as create or update is called in a typical Rails controller with the usual seven RESTful methods. If we look at the code for the create method we’ll see that once a valid Product has been saved the action sets a flash message then redirects to the show action for the newly-created product.
/app/controllers/products_controller.rb
def create
  @product = Product.new(params[:product])
  if @product.save
    flash[:notice] = "Successfully created product."
    redirect_to @product
  else
    render :action => 'new'
  end
end
This is fairly common behaviour in a controller and in Rails 3 we can combine those two lines so that the flash notice becomes a parameter of the redirect_to method.
/app/controllers/products_controller.rb
def create
  @product = Product.new(params[:product])
  if @product.save
    redirect_to @product, :notice => "Successfully created product."
  else
    render :action => 'new'
  end
end
Either :notice or :alert will work here but any other type of flash message will have to be embedded in a :flash hash. This feature was also added into Rails 2.3.6 so if you’re using the latest version of Rails 2 then you can use this shortcut in your Rails 2 applications as well.
The redirect_to method above takes a model object as a parameter. Passing in a Product model object as @product is a shortcut for using product_path(@product) and is translated into the path for the show action for that product. If we wanted to redirect to the edit page for that product instead we could use edit_product_path(@product), but there is another shortcut we can take advantage of. Instead of writing
redirect_to edit_product_path(@product)
we can write:
redirect_to [:edit, @product]
This will be translated into the same edit product path above, but with slightly less code. Like the :notice option above this also works in the later versions of Rails 2. This shortcut works with nested resources too, so if a product belongs to a category we can redirect with:
redirect_to [@category, @product]
This array technique works anywhere that you can generate a URL and can be used in view code in a link_to method as well as in controllers.
Permanent Cookies
The next new feature we’ll demonstrate is permanent cookies. Let’s say that when a user creates a new product we want to store that product’s id in a cookie. We can use the cookies method to do that:
/app/controllers/proucts_controller.rb
def create
  @product = Product.new(params[:product])
  if @product.save
    cookies[:last_product_id] = @product.id
    redirect_to @product, :notice => "Successfully created product."
  else
    render :action => 'new'
  end
end
This code creates a session cookie that will last only as long as the user keeps their browser window open. To create a cookie with an explicit expiration date in Rails 2 we’d have to turn the value into a hash and set an explicit expiry time like this:
cookies[:last_product_id] = { :value => @product_id, :expires => 1.month.from_now }
In Rails 3 (and in Rails 2.3.6 and above) we can use a new cookies.permanent method to create a cookie with a long expiry time.
cookies.permanent[:last_product_id] = @product.id
We can also create signed cookies this way and while we won’t be going into detail about that here there’s a great blog post by Pratik Naik on this subject that’s well worth reading. Essentially we can use a cookies.permanent.signed method to generate an encrypted cookie and read it back later. Note that we’ll need to get the cookie_verifier_secret in our application for this to work.
Using respond_with
The last thing we’ll show you in this episode is probably the most significant addition to Rails 3 controllers: respond_with. We’ll demonstrate this by adding a REST service over an XML interface to our ProductsController. This means that each of the controller’s actions will need to return an XML response in addition to its default HTML response.
In a Rails 2 application we’d implement this by using respond_to in each action, like this:
/app/controllers/products_controller.rb
def index
  @products = Product.all
  respond_to do |format|
    format.html
    format.xml { render :xml => @products }
  end
end
Inside the respond_to block we specify each of the formats that the action responds to, rendering the XML version of the products array for an XML request. This approach can quickly become cumbersome if we need to do it for every action in a controller.
In Rails 3 we can replace this code with a call to respond_with, passing in the appropriate object, in this case the array of products. For respond_with to work we also need to use the class method respond_to to specify which MIME types the controller should respond to and so that respond_with knows what to respond with in each action.
/app/controllers/products_controller.rb
class ProductsController < ApplicationController
  respond_to :html, :xml
  def index
    @products = Product.all
    respond_with @products
    end
  end
  # Other methods
end
Now that we’ve changed our ProductsController to use respond_with let’s see if the changes have worked. If we visit the products index page in a browser we’ll see the HTML index action rendered as we’d expect.

And if we append .xml to the URL we’ll get the XML response.
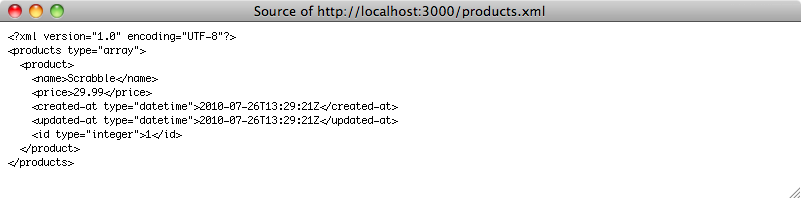
How does the respond_with method work? For a simple GET request like index it looks for a view file to render for the appropriate MIME type, such as an .html.erb file and will render it. If respond_with fails to find a view file then it will try to call a method like to_xml or to_json to render the object that was passed in the appropriate format.
Knowing this we can update the show and new methods in the ProductsController to use respond_with.
/app/controller/products_controller.rb
def show
  @product = Product.find(params[:id])
  respond_with @product
end
def new
  @product = Product.new
  respond_with @product
end
The create action is more complicated as it has some HTML-specific code in it, for example calls to redirect_to and render. We don’t want to use these in an XML response but we can get around this by just removing them from the method and adding a call to respond_with so that the method looks like this:
/app/controllers/products_controller.rb
def create
  @product = Product.new(params[:product])
  if @product.save
    cookies[:last_product_id] = @product.id
    flash[:notice] = "Successfully created product."
  end
  respond_with(@product)
end
We can do this because respond_with will automatically redirect or render depending on whether the object passed to it is valid. We can now add respond_with to the other methods in the controller, removing any HTML-specific code. When we’re done our controller’s code will look like this:
/app/controllers/products_controller.rb
class ProductsController < ApplicationController
  respond_to :html, :xml
  def index
    @products = Product.all
    respond_with @products
  end
  def show
    @product = Product.find(params[:id])
    respond_with @product
  end
  def new
    @product = Product.new
    respond_with @product
  end
  def create
    @product = Product.new(params[:product])
    if @product.save
      cookies[:last_product_id] = @product.id
      flash[:notice] = "Successfully created product."
    end
    respond_with(@product)
  end
  def edit
    @product = Product.find(params[:id])
    respond_with(@product)
  end
  def update
    @product = Product.find(params[:id])
    if @product.update_attributes(params[:product])
      flash[:notice] = "Successfully updated product."
    end
    respond_with(@product)
  end
  def destroy
    @product = Product.find(params[:id])
    @product.destroy
    flash[:notice] = "Successfully destroyed product."
    respond_with(@product)
  end
end
The respond_with method can be a little confusing so here’s a summary.
For a GET request respond_with will first look for a view that responds to that specific format. If it finds one it will render it; if not it will call to_xml (or whatever format is requested) on the object that was passed to it.
For any other type of request respond_with first checks that the object passed in has any errors. If it does then the appropriate view will be rendered (e.g. new for the create action and edit for update). If there are none then it will redirect to that specific object’s page (i.e. the show action).
We can test this out by editing one of our products.
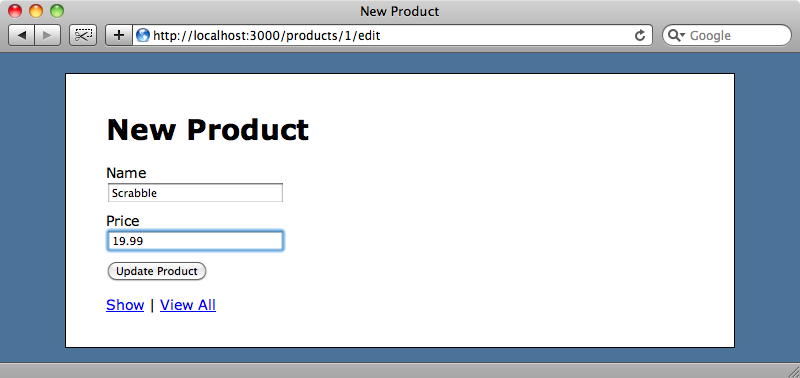
When we click the “Update Product” button the update action is called and respond_with will execute a redirect to that product’s page.

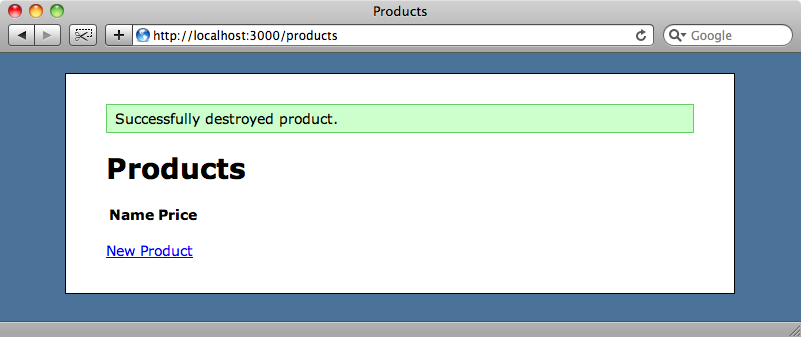
Likewise if we click the “destroy” link we’ll be redirected to the index page.
If the default behaviour of respond_with doesn’t suit certain parts of our application we can customize it for certain actions. As an example let’s say that when we update a product we want the application to redirect to the index action instead of the default show action. In this case we can pass a location option to respond_with so that it redirects to a different action. To redirect to the products index page instead of a specific product’s page we can change the update action like this:
/app/controllers/products_controller.rb
def update
  @product = Product.find(params[:id])
  if @product.update_attributes(params[:product])
    flash[:notice] = "Successfully updated product."
  end
  respond_with(@product, :location => products_url)
end
We can also override specific formats by passing a block to respond_with just like we would with respond_to. So if we want to just render some text for the XML format of the edit action we can do so.
/app/controllers/products_controller.rb
def edit
  @product = Product.find(params[:id])
  respond_with(@product) do |format|
    format.xml { render :text => "I'm XML!" }
  end
end
When we visit the XML version of the edit page now we’ll see that string rendered.

Finally, if we need complete customization we can pass in a custom responder class. That way the controller will hand everything over to that class and the behaviour of the response as much as we like.
respond_with(@product, :responder => MyResponder)
For an example of creating a Responder class take a look at the built in Responder class in Rails 3. The code is fairly easy to read and is well-documented and, if nothing else, you get a better idea of how a responder works.
That’s it for this episode. As you can see respond_with is a really convenient way to handle multiple formats. But if you see yourself customizing it too much it might be easier to move everything inline and not use it. Alternatively, if you have a lot of duplication you can create your own custom responder class.