
340: DataTables
(view original Railscast)
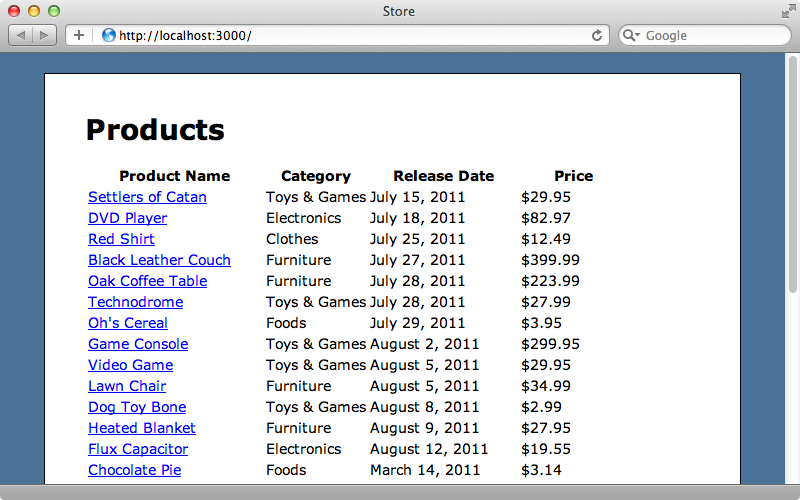
DataTables makes it easy to turn a plain HTML table into one with pagination, sorting and searching and all through JavaScript. In this episode we’ll show you how to set it up and how to supply data from a Rails application. The page below displays a plain table of Product records. We’ll add DataTables to it to improve it.
Adding DataTables to Our Application
We could just download the source code and use it in our Rails application but this is a little difficult to add to the asset pipeline as the code includes references to images with relative paths that we’d have to fix. Fortunately there’s a jquery-datatables-rails gem available that makes this much easier. We’ll add this to the assets group in our gemfile. As this gem is updated fairly frequently and we want to use the latest version we’ll use the github option and pass in the project’s path.
/Gemfile
group :assets do
  gem 'sass-rails',   '~> 3.2.3'
  gem 'coffee-rails', '~> 3.2.1'
  # See sstephenson/execjs#readme for more supported runtimes
  # gem 'therubyracer', :platform => :ruby
  gem 'uglifier', '>= 1.0.3'
  gem 'jquery-datatables-rails', github: 'rweng/jquery-datatables-rails'
end
The github option is new in Bundler 1.1. If you don’t have this you’ll need to pass in the full git path instead. As always when adding a gem we’ll need to run bundle to install it. We can now set DataTables up with the asset pipeline. First we’ll go to the application.js file and add a call to dataTables/jquery.dataTables in the manifest.
/app/assets/javascripts/application.js
//= require jquery
//= require jquery_ujs
//= require dataTables/jquery.dataTables
//= require_tree .
There’s also come CSS we need to include so we’ll need to do add something in application.css, too.
/app/assets/stylesheets/application.css
/*
 * This is a manifest file that'll automatically include all the stylesheets available in this directory
 * and any sub-directories. You're free to add application-wide styles to this file and they'll appear at
 * the top of the compiled file, but it's generally better to create a new file per style scope.
 *= require_self
 *= require dataTables/jquery.dataTables
 *= require_tree .
*/
Adding DataTables to Our Table
Now that we have DataTables installed in our application we can use it to improve our table of products. The view code for that table is shown below and it’s fairly straightforward; all we do is loop through each product and render it in the table.
/app/views/products/index.html.erb
Products
| Product Name | Category | Release Date | Price |
|---|---|---|---|
| <%= link_to(product.name, product) %> | <%= product.category %> | <%= product.released_on.strftime("%B %e, %Y") %> | <%= number_to_currency(product.price) %> |
To prepare this table for use with DataTables we need to wrap the header row inside a thead element and the body section in tbody. We also need a way to reference the the table from JavaScript so we’ll give it an id.
/app/views/products/index.html.erb
Products
| Product Name | Category | Release Date | Price |
|---|---|---|---|
| <%= link_to(product.name, product) %> | <%= product.category %> | <%= product.released_on.strftime("%B %e, %Y") %> | <%= number_to_currency(product.price) %> |
We can add DataTables to this table now with some CoffeeScript code. We’ll do this in the products.js file. All we need to do is ensure that the DOM has loaded then call dataTable on our table.
/app/assets/javascripts/products.js
jQuery ->
	$('#products').dataTable()
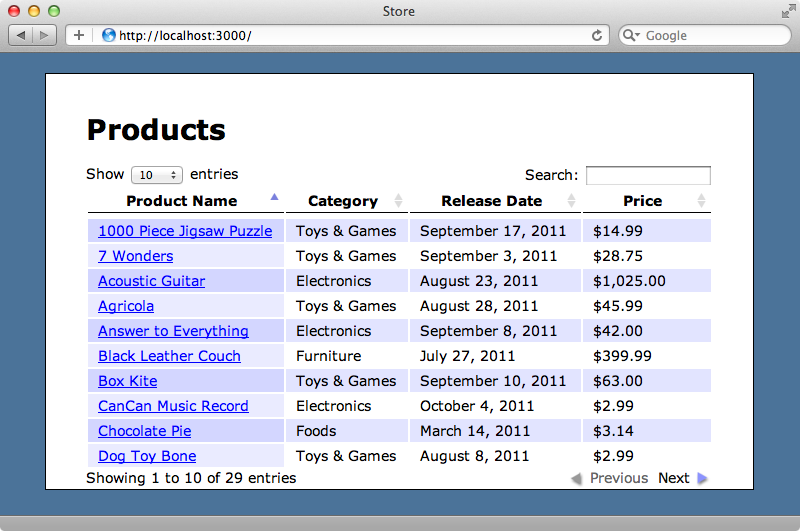
When we reload the page now our table looks quite different. We now have a DataTable with pagination, sorting and searching.
Customizing Our DataTable
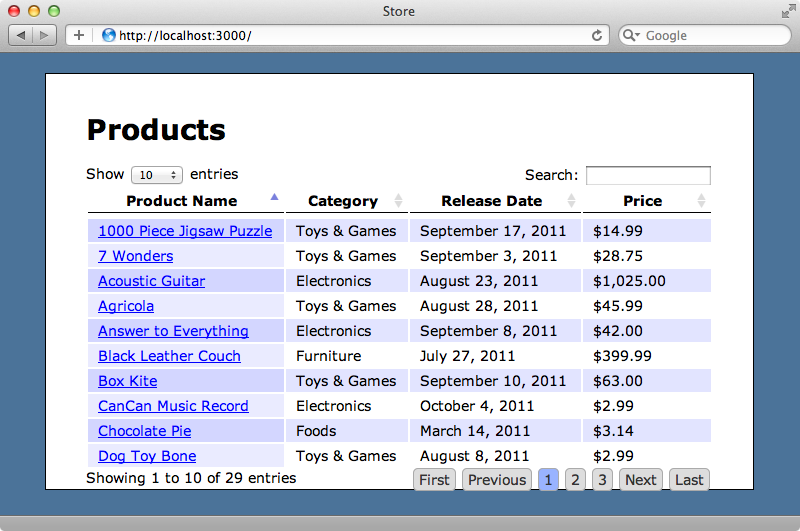
There are many different options that we can pass to dataTable to change our table’s appearance and behaviour. For example setting sPaginationType will change the pagination; if we set this to full_numbers this will show a link for each page. The usage section of the DataTables site has a full list of the options we can use to customize our DataTable.
/app/assets/javascripts/products.js.coffee
jQuery ->
	$('#products').dataTable
	  sPaginationType: "full_numbers"
Reloading the page now will show the new pagination style.
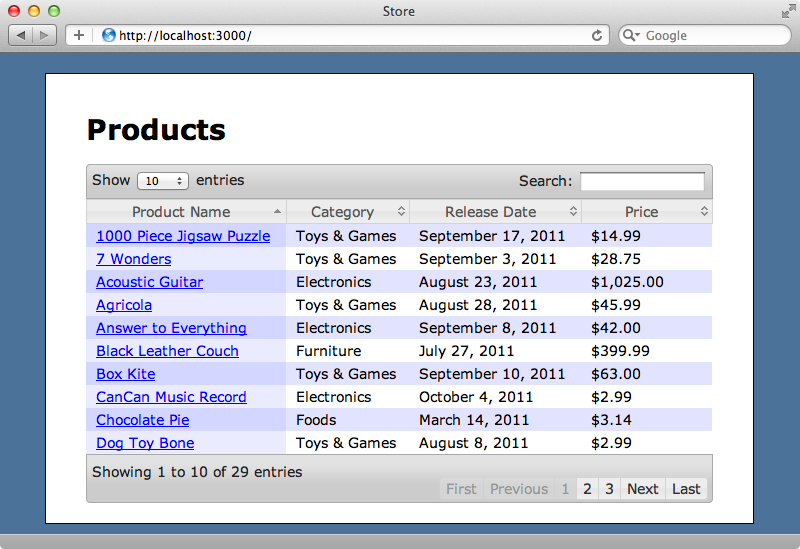
Improving The Styling
The styling for our table isn’t perfect but we can change this. The DataTables homepage has an example table that’s nicely styled and we can use this with our table. The example table uses jQuery UI and this is included in the jquery-rails gem that’s in our gemfile. The CSS styling that we need for our table isn’t included, however, but there’s another gem, called jquery-ui-rails, that does. To add this we just include it in the gemfile and then run bundle again.
/Gemfile
group :assets do
  gem 'sass-rails',   '~> 3.2.3'
  gem 'coffee-rails', '~> 3.2.1'
  # See sstephenson/execjs#readme for more supported runtimes
  # gem 'therubyracer', :platform => :ruby
  gem 'uglifier', '>= 1.0.3'
  gem 'jquery-datatables-rails', github: 'rweng/jquery-datatables-rails'
  gem 'jquery-ui-rails'
end
To add the CSS to our application we need to add jquery.ui.core and jquery.ui.theme our application.css file. This will include the Smoothness theme. We also need to replace the DataTables CSS file with one that is designed for jQuery UI and one called demo_table_jui is provided under the src directory. We’ll replace the jQuery.dataTables CSS with this.
/app/assets/stylesheets/application.css
/*
 * This is a manifest file that'll automatically include all the stylesheets available in this directory
 * and any sub-directories. You're free to add application-wide styles to this file and they'll appear at
 * the top of the compiled file, but it's generally better to create a new file per style scope.
 *= require_self
 *= require jquery.ui.core
 *= require jquery.ui.theme
 *= require dataTables/src/demo_table_jui
 *= require_tree .
*/
We now need to add a bJQueryUI option to our call to dataTable.
/app/assets/javascripts/products.js.coffee
jQuery ->
	$('#products').dataTable
	  sPaginationType: "full_numbers"
	  bJQueryUI: true
Finally we’ll need to give our table a class of display.
/app/views/products/index.html.erb
| Product Name | Category | Release Date | Price |
|---|
In our Coffeescript file we’ll need to add some more options to the call to dataTable to tell it to fetch data from the server.
/app/assets/javascripts/products.js.coffee
jQuery ->
	$('#products').dataTable
	  sPaginationType: "full_numbers"
	  bJQueryUI: true
	  bProcessing: true
	  bServerSide: true
	  sAjaxSource: $('#products').data('source')
The bProcessing option shows a “Processing” message while fetching data from the server. Setting bServerSide to true means that the data will be fetched from the server. Finally sAjaxSource sets the URL that the data will be fetched from and we set this to the value in the data-source attribute that we defined in our table. DataTable will now trigger the ProductsController’s index action and it will expect a JSON response. We’ll use a respond_to block to do this. The tricky part will be responding with the proper JSON. One option would be to use something like JBuilder or RABL, but these solutions can get messy very quickly as there’s quite a lot of logic required to generate the correct response.
If the MVC structure of Rails ever feels limiting and doesn’t fit with what we’re trying to do there’s nothing wrong with creating a new class if it leads to cleaner code. This is the approach we’ll take here. We’ll create a new ProductsDatatable class to generate the JSON and we’ll have it take a view context in its constructor so that it has access to helper methods. This makes it like a mini-presenter for a JSON response. We’ll create this class in a new datatables directory under the app directory. There’s too much code in this class to show here, but you can find the whole thing on Github. We’ll run through it quickly and show the most interesting parts.
The initializer takes a view context and assigns it to an instance variable. We delegate a few helper methods to this view so that we can conveniently call them from here.
/app/datatables/products_datatable.rb
delegate :params, :h, :link_to, :number_to_currency, to: :@view
def initialize(view)
  @view = view
end
The as_json method is triggered behind the scenes by the render_json call in the controller. This will return all the data that DataTables expects including all the relevant rows from the database. This data comes from a data method and this method loops through each of the products and returns a two-dimensional array containing the information for each cell in the table.
/app/datatables/products_datatable.rb
def as_json(options = {})
  {
    sEcho: params[:sEcho].to_i,
    iTotalRecords: Product.count,
    iTotalDisplayRecords: products.total_entries,
    aaData: data
  }
end
private
def data
  products.map do |product|
    [
      link_to(product.name, product),
      h(product.category),
      h(product.released_on.strftime("%B %e, %Y")),
      number_to_currency(product.price)
    ]
  end
end
The products are fetched in a fetch_products method. This fetches the correct page of data in the correct order filtered by a search term if one is present. The search query itself is simple but we could expand on it, maybe by using a full-text search engine such as Sphinx or Solr.
/app/datatables/products_datatable.rb
def fetch_products
  products = Product.order("#{sort_column} #{sort_direction}")
  products = products.page(page).per_page(per_page)
  if params[:sSearch].present?
    products = products.where("name like :search or category like :search", search: "%#{params[:sSearch]}%")
  end
  products
end
The rest of the class is made up of methods to help with sorting and pagination. Now that we have this class we can use it in our controller action.
/app/controllers/products_controller.rb
def index
  respond_to do |format|
    format.html
    format.json { render json: ProductsDatatable.new(view_context) }
  end
end
When we reload the page now (we may need to restart the server first) everything works much as it did before. We still have the same pagination, sorting and searching behaviour but now the data is being supplied by the Rails application instead of being loaded all in one go on the client.
That’s it for our episode on DataTables. It does require some effort if you need server-side processing but the end result is well worth it. If you’re interested in an alternative solution where we create something similar from scratch take a look at episode 240.