
334: Compass & CSS Sprites
(view original Railscast)
Compass makes it more convenient to generate stylesheets with SASS by providing useful mixins, functions and more. The new CompassRails gem makes it easier than ever to integrate it with Rails’ asset pipeline. Below is a simplified version of the Railscasts site design. We’re going use Compass to improve the underlying styling for this application while maintaining the same look.
To add Compass to a Rails app we just need to add the CompassRails gem to the assets group in the gemfile and then run bundle.
/Gemfile
# Gems used only for assets and not required
# in production environments by default.
group :assets do
  gem 'sass-rails',   '~> 3.2.3'
  gem 'coffee-rails', '~> 3.2.1'
  # See sstephenson/execjs#readme for more supported runtimes
  # gem 'therubyracer'
  gem 'uglifier', '>= 1.0.3'
  gem 'compass-rails'
end
gem 'jquery-rails'
Next we’ll need to rename our application.css file to application.css.scss. This turns it into a SASS-interpreted file and it’s necessary to do this so that we have a location where we can load Compass and share it across our application’s SASS files. Sprockets can’t give us this functionality so we’ll remove its manifest from this file and instead use SASS to import the necessary files. Our application has a layout.css.scss file so we’ll import that as well as the compass file.
/app/assets/application.css.scss
@import "compass";
@import "layout";
As we’ve added a gem to our application we’ll need to restart the server. When we reload the page after doing that our page looks just as it did before and that’s good. The only difference is that we can now use Compass to improve our SASS code.
Using Compass in Our Application
Adding the compass file to our application gives us access to Compass’s new functionality. Compass makes it easier to work with CSS3 and with it we can add CSS features without needing to specify browser vendor prefixes for gradients, box shadows or border radiuses. The Railscasts application uses a gradient and these are documented in the images section. We’ll use Compass to improve the code in the navigation bar. This styling is handled by the layout file.
/app/assets/stylesheets/layout.css.scss
#nav_bar {
  position: relative;
  padding: 8px 100px;
  margin-bottom: 15px;
  border-top: solid 1px #FFF;
  border-bottom: solid 3px #DE9F00;
  background-color: #333;
  background-image: -webkit-linear-gradient(#5c5c5c, #111111);
  background-image: -moz-linear-gradient(#5c5c5c, #111111);
  background-image: -ms-linear-gradient(#5c5c5c, #111111);
  background-image: linear-gradient(#5c5c5c, #111111);
  .nav {
    float: right;
    padding-top: 2px;
    li {
      padding-left: 25px;
      font-size: 14px;
      color: #BBB;
      a { color: #FFF; }
    }
  }
}
In this file we define the gradients four times to allow for different vendor prefixes. With Compass we don’t need to do this. Instead we can use just one line of code.
/app/assets/stylesheets/layout.css.scss
@include background-image(linear-gradient(#5c5c5c, #111111));
This will generate all the browser-specific prefixes for us. When we reload the page now it still looks the same but if we look at the generated CSS we’ll see the all the gradients that Compass has generated.
/assets/application.css
/* line 69, ../../app/assets/stylesheets/layout.css.scss */
#nav_bar {
  position: relative;
  padding: 8px 100px;
  margin-bottom: 15px;
  border-top: solid 1px #FFF;
  border-bottom: solid 3px #DE9F00;
  background-color: #333;
  background-image: -webkit-gradient(linear, 50% 0%, 50% 100%, color-stop(0%, #5c5c5c), color-stop(100%, #111111));
  background-image: -webkit-linear-gradient(#5c5c5c, #111111);
  background-image: -moz-linear-gradient(#5c5c5c, #111111);
  background-image: -o-linear-gradient(#5c5c5c, #111111);
  background-image: -ms-linear-gradient(#5c5c5c, #111111);
  background-image: linear-gradient(#5c5c5c, #111111);
}
Using CSS Sprites
If all we want from Compass are the CSS3 conveniences then we could use Bourbon instead as we showed in episode 330. Compass provides much more, though, including CSS sprites. CSS sprites are a technique for combining a number of small images into one larger image and then using CSS to show just a part of each image. On our page we have a row of icons that let you subscribe to Railscasts in a variety of ways. Each of these icons is a separate image which means that a separate HTTP request will be made to get each one. It’s good practice to reduce the number of requests that a page makes. It we merge all these icons into one file we can use CSS to display a selected part of that image for each icon.
CSS sprites can be a pain to implement manually but Compass makes it easy. The icons are currently being handled by calls to background-image.
/app/assets/stylesheets/layout.css.scss
#subscribe {
  position: absolute;
  bottom: 10px;
  right: 100px;
  li {
    position: relative;
    margin-left: 8px;
    font-size: 12px;
  }
  a {
    display: block;
    width: 34px;
    height: 34px;
  }
  .itunes   { background-image: image-url("icons/itunes.png"); }
  .twitter  { background-image: image-url("icons/twitter.png"); }
  .facebook { background-image: image-url("icons/facebook.png"); }
  .rss      { background-image: image-url("icons/rss.png"); }
}
To use Compass’s sprites we first need to take all the images we want to combine and put them in the same directory. Ours are already in /app/assets/images/icons so we don’t need to do this. We can load the images into Compass by calling @import and passing in the path.
/app/assets/stylesheets/layout.css.scss
@import "icons/*.png";
This will load up all the images in that directory and make a single sprite image from them. There are couple of different ways that we can use this. The more manual approach is to replace the call to background-image for each icon.
/app/assets/stylesheets/layout.css.scss
.itunes   { @include icons-sprite(itunes); }
.twitter  { @include icons-sprite(twitter); }
.facebook { @include icons-sprite(facebook); }
.rss      { @include icons-sprite(rss) }
Again the page looks the same when we reload it but all the icons are now merged down into a single image so that they can all be downloaded in a single request.
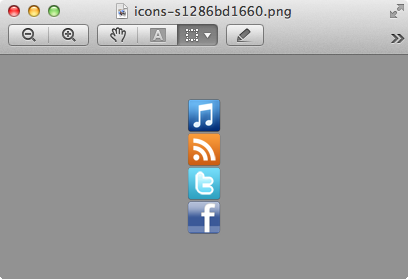
Compass provides a more convenient way to do this. Instead of loading the sprites individually into a separate CSS class we can do it all through Compass. We can remove the CSS for the four classes that represent the icons and then replace them with this.
/app/assets/stylesheets/layout.css.scss
@import "icons/*.png";
@include all-icons-sprites;
This will automatically make a separate CSS class for each of these images. We’ll need to change the HTML so that it references them. Each icon is displayed in a list like this.
/app/views/layouts/application.html.erb
We just need to prefix each class with the name of the directory, in this case icons, and a dash.
/app/views/layouts/application.html.erb
The page still looks the same now but the generated CSS references the single image and uses background-position to show the relevant part of it for each icon.
/assets/application.css
/* line 66, icons/*.png */
.icons-sprite, .icons-facebook, .icons-itunes, .icons-rss, .icons-twitter {
  background: url(/assets/icons-s1286bd1660.png) no-repeat;
}
/* line 60, ../../../.rvm/gems/ruby-1.9.3-p125/gems/compass-0.12.1/frameworks/compass/stylesheets/compass/utilities/sprites/_base.scss */
.icons-facebook {
  background-position: 0 -102px;
}
There’s more information about sprites in the “Spriting With Compass” tutorial.
Simple Horizontal Lists
All of Compass’s documentation is good and it’s well worth taking the time to browse through the Reference and Help sections to get an idea as to what else Compass provides. There are many useful utility functions and one of these makes it much easier to generate horizontal lists. Lists are often used for rendering navigation menus and we can use the horizontal-list mixin to simplify this. The Railscasts site has a .horizontal CSS class which does just that and its SASS code looks like this:
/app/assets/stylesheets/layout.css.scss
ul.horizontal {  list-style: none;
  margin: 0;
  padding: 0;
  li {
    margin: 0;
    padding: 0;
    float: left;
  }
}
We can replace this with a call to that mixin.
/app/assets/stylesheets/layout.css.scss
ul.horizontal {
	@include horizontal-list;
}
Each horizontal list on the page is still rendered horizontally now, although we may need to adjust the margins or padding a little for each one.
Compass Reset
Compass Reset is another useful feature. Browsers have different default values for sizing and spacing different elements. Compass Reset will set everything to zero so that we can build styles back up consistently across different browsers. To use it we just need to import it in our application.css.scss file.
/app/assets/stylesheets/application.css.scss
@import "compass";
@import "compass/reset";
@import "layout";
This is one of the few compass commands that will insert CSS into our layout so we need to be aware of this when using it. With it in place the “Welcome” text which is in an h1 element is much smaller.

Most sites will look worse after the Reset CSS is added as most designs rely on the browsers’ default styles to some degree. With the Reset in place, though, we can now build the styles up in a way that’s consistent across different browsers. For example we can now specifically declare how we want h1 elements to be rendered.
/app/assets/stylesheets/layout.css.scss
h1 {
	font-size: 28px;
	font-weight: bold;
	margin: 18px 0;
}
Now our page looks like it did before.
CSS Resets aren’t a good thing all the time, but if it’s important that your design is consistent across browsers then it’s worth considering using one. For an alternative to Compass Reset take a look at normalize.css. This sets defaults that are closer to the browsers’ defaults which means that we don’t need to rebuild every element up from scratch.
Further Reading
That’s it for this episode. There are a number of features we haven’t covered so be sure to take a look at the web site for more information. One part of Compass that we haven’t covered is the blueprint module. This is an entire CSS framework for building grid-based designs. It’s also worth reading the README for the CompassRails for some alternative approaches to integrating them together. If you’re using an earlier version of Rails there’s some useful information there on getting it working with CompassRails.
Although Compass is a large framework it is very modular. This means that we can include just the parts we need for our application.