
143: PayPal Security
(view original Railscast)
Over the last two episodes we’ve written a small e-commerce application that uses PayPal’s checkout process to handle orders. We haven’t yet made any attempts to secure the data that is sent to PayPal; currently all of the details for each item the cart are sent in plain text via a hyperlink, including the price. This would make it easy for anyone to buy any of our products at any price they chose by simply altering the URL sent to PayPal.
item_name_1=Black%20Leather%20Sofa&upload=1&amount_1=899
The details for one of the items in the cart.
Encrypting Our Cart’s Data
PayPal gives us with a method that will allow us to encrypt our cart data before it is sent. To use it we’ll first have to create a private key and a public certificate, then upload our certificate to PayPal and download their public certificate. We can then use these to encrypt the cart’s data.
The key and certificates will live in a directory in our Rails app. We’ll create a certs directory in our app, then generate the private key there.
NooNoo:ep143 eifion$ mkdir certs
NooNoo:ep143 eifion$ cd certs
NooNoo:certs eifion$ openssl genrsa -out app_key.pem 1024
Generating RSA private key, 1024 bit long modulus
........................................................++++++
.....................................................++++++
e is 65537 (0x10001)
NooNoo:certs eifion$
Generating a private key.
Our private key will be used to make a public certificate. We’ll be asked a few simple questions along the way about our organisation. For more information about the parameters used by the openssl command see their website.
NooNoo:certs eifion$ openssl req -new -key app_key.pem -x509 -days 365 -out app_cert.pem
You are about to be asked to enter information that will be incorporated
into your certificate request.
What you are about to enter is what is called a Distinguished Name or a DN.
There are quite a few fields but you can leave some blank
For some fields there will be a default value,
If you enter '.';, the field will be left blank.
-----
Country Name (2 letter code) [AU]:UK
State or Province Name (full name) [Some-State]:Conwy
Locality Name (eg, city) []:Glan Conwy
Organization Name (eg, company) [Internet Widgits Pty Ltd]:ASCIIcasts
Organizational Unit Name (eg, section) []:
Common Name (eg, YOUR name) []:Eifion
Email Address []:eifion@asciicasts.com
NooNoo:certs eifion$
Generating the public certificate.
Swapping Certificates With PayPal
There should now be a certificate file called app_cert.pem in our certs directory that we can upload to PayPal. To do that we’ll log in to the PayPal sandbox with the seller account we created back in episode 141. Once logged in we can click the ‘profile’ link under ‘My Account’, then on the Profile Summary page click the ‘Encrypted Payment Settings’ link under the ‘Selling Preferences’ tab. On this page are options for uploading and downloading certificates.
Clicking the ‘add’ button at the bottom of the ‘Your Public Certificates’ part of the page will take us to another page where we can upload our certificate. We’ll upload the app_cert.pem file we generated earlier (not the app_key.pem file which is our own private key). After the certifcate has been uploaded we should see our certificate listed. We’ll make a note of the Cert ID that PayPal gives to the certificate as we’ll need to use it in our code.
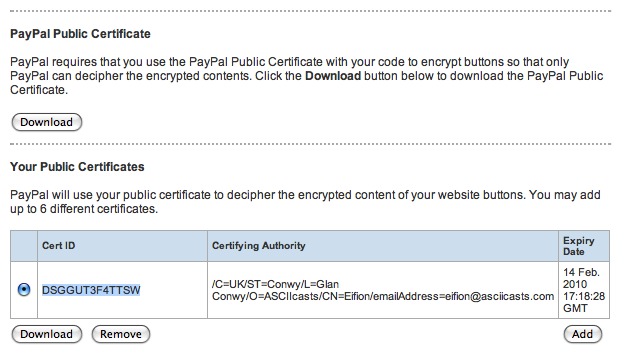
Part of the PayPal page showing our uploaded certificate.
Having uploaded our certificate we’ll now have to download PayPal’s public certificate. There is a button on the same page that allows us to do this and which will give us a file called paypal_cert_pem.txt. We’ll copy this file into our application’s certs directory and rename it to paypal_cert.pem. We now have the three files needed to encrypt our cart data before it is sent to PayPal.
Updating Our Checkout Link
Currently, our checkout link is just a hyperlink. We could keep it as a link to send our encrypted data but the URL could easily become very long so instead we’re going to use a form with a submit button and POST the data instead. The checkout link code at the bottom of the cart’s view page will be replaced with the code below.
<% form_tag "https://www.sandbox.paypal.com/cgi-bin/webscr" do %>
  <%= hidden_field_tag :cmd, "_s-xclick" %>
  <%= hidden_field_tag :encrypted, @cart.paypal_encrypted(products_url, payment_notifications_url) %>
    <p><%= submit_tag "Checkout" %></p>
<% end %>
The form that replaces the checkout link
The form POSTs to the same PayPal page as the link did and the parameters are passed in two hidden fields. The first, cmd, has the value _s-xclick, which tells PayPal to expect encrypted data. The second, encrypted, will contain the encrypted cart data. This data will come from our cart model. We will reuse the paypal_url method, renamed to paypal_encrypted to provide the parameters for the form.
def paypal_encrypted(return_url, notify_url)
    values = {
      :business => 'seller_1234111143_biz@asciicasts.com',
      :cmd => ’_cart’,
      :upload => 1,
      :return => return_url,
      :invoice => id,
      :notify_url => notify_url,
      :cert_id => "DSGGUT3F4TTSW"
    }
    line_items.each_with_index do |item, index|
      values.merge!({
        "amount_#{index + 1}" => item.unit_price,
        "item_name_#{index + 1}" => item.product.name,
        "item_number_#{index + 1}" => item.product.identifier,
        "quantity_#{index + 1}" => item.quantity
      })
    end
    encrypt_for_paypal(values)
  end
The paypal_encrypted method in the Cart model.
The method has had two changes made from the original one that generated the URL. We’ve added a cert_id item to the values hash that takes the Cert Id value we were given by PayPal when we added our certificate and, instead of returning the values hash as a query string we’re calling a new method called encrypt_for_paypal that will return the encrypted values.
The encrypt_for_paypal method is fairly complex. Above it we define three constants to hold the contents of both public certificates and our private key. The method itself contains two long and rather ugly lines that read the values hash and encode it using OpenSSL.
PAYPAL_CERT_PEM = File.read("#{Rails.root}/certs/paypal_cert.pem")
APP_CERT_PEM = File.read("#{Rails.root}/certs/app_cert.pem")
APP_KEY_PEM = File.read("#{Rails.root}/certs/app_key.pem")
def encrypt_for_paypal(values)
    signed = OpenSSL::PKCS7::sign(OpenSSL::X509::Certificate.new(APP_CERT_PEM),	OpenSSL::PKey::RSA.new(APP_KEY_PEM, ''), values.map { |k, v| "#{k}=#{v}" }.join("\n"), [], OpenSSL::PKCS7::BINARY)
    OpenSSL::PKCS7::encrypt([OpenSSL::X509::Certificate.new(PAYPAL_CERT_PEM)], signed.to_der, OpenSSL::Cipher::Cipher::new("DES3"),	OpenSSL::PKCS7::BINARY).to_s.gsub("\n", "")
end
Encrypting The Data
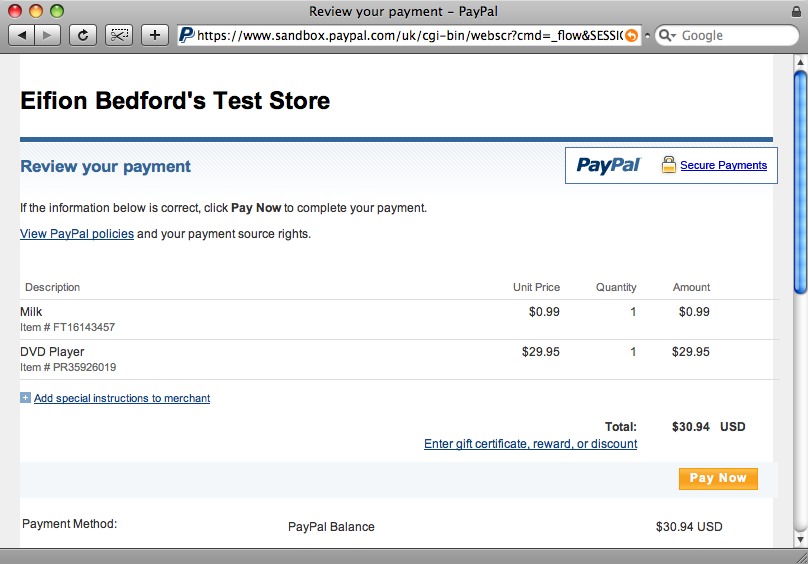
If we reload our cart page and view the source we’ll see the encrypted cart details in the encrypted hidden field in the cart’s form. As the cart items details are no longer stored in plain text this makes it impossible for the prices of the items to be changed. Clicking the ‘checkout’ button will take us to the PayPal site where we can see our items.
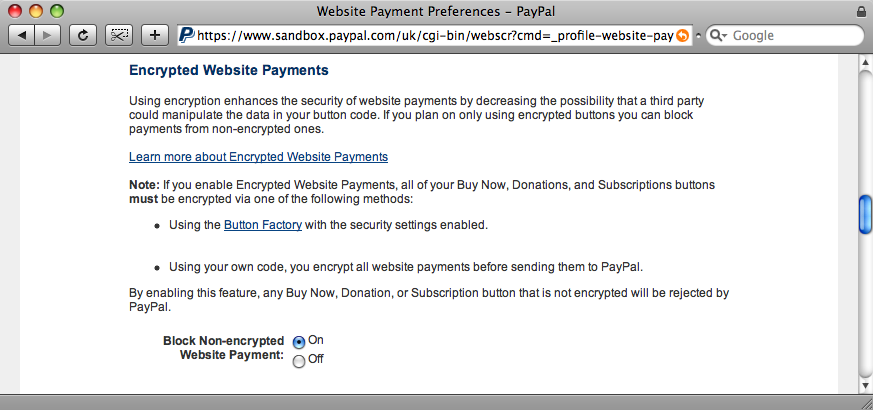
A Further Security Measure
Now that we’re using encryption it’s a good idea to block unencrypted requests. To do this we’ll go back to the profile section of our seller’s PayPal account and click the ‘Website Payment Preferences’ link. On that page is a section that will allow us to refuse all unencrypted requests.
One More Thing
Our application is not entirely secure yet as there’s still one area where we interact with PayPal. Instant Payment Notification makes a call back to our site as the transaction is processed. This call can be spoofed, which could lead to our site believing that a cart had been purchased when it actually had not.
There are two ways around this problem. The first is to create a ‘post back’. When we receive our notification we can send a request back to PayPal for a confirmation that the request actually came from them. The other option is to create a shared secret. For this we append a variable to the notification URL and then check that that variable holds the same value when the notification is made. This method is only useful if the values are encrypted which for our site is now the case, so we’ll do this. In the cart’s view we’ll add a parameter to the payment_notifications_url.
<%= hidden_field_tag :encrypted, @cart.paypal_encrypted(products_url, payment_notifications_url(:secret => ’foobar’)) %>
Adding a parameter to the payment notification URL.
In the PaymentNotification model we’ll check that parameter and only mark the cart as purchased if it matches the value we passed it.
def mark_cart_as_purchased
  if status == "Completed" && params[:secret] == "foobar"
    cart.update_attributes(:purchased_at => Time.now)
  end
end
Checking for the extra parameter sent back by PayPal.
We could go further and mark the cart as fraudulent and send emails out to the site administrators if the shared secret is missing or incorrect. To be really sure that the transaction is correct we can check more of the parameters that are sent back, for example that the seller email is correct and that the total price matches the price of the items in the cart. We could, if we wanted to, check absolutely every parameter that PayPal sends back to us, but we’re going to leave it as it is for this application.
def mark_cart_as_purchased
  if status == "Completed" && params[:secret] == "foorbar" &&
    params[:receiver_email] == "eifion_1234609007_biz@asciicasts.com" &&
    params[:mc_gross] == cart.total_price.to_s && params[:mc_currency] ==   "GBP"
      cart.update_attributes(:purchased_at => Time.now)
  end
end
Making further checks to ensure that our transaction is genuine.
Some Final Tidying Up
Our application now sends encrypted data, but there are several hard-coded strings littered around the code that are specific to the development environment. It would be good if we could move these out into a configuration file so that they can be easily changed when our application goes into production. We’ll need to create two new files to do this. The first will live in the /config/initializers folder. This is a special folder that was introduced with Rails 2.0 and all of the files in it will be run when our application starts up. The file is below and is called load_app_config.rb.
raw_config = File.read(RAILS_ROOT + "/config/app_config.yml")
APP_CONFIG = YAML.load(raw_config)[RAILS_ENV].symbolize_keys
This file reads the contents of a file called app_config.yml in the /config directory and searches in it for a key named after the current environment (development, test or production). The config file can now contain all of the variables that differ across environments.
development:
    paypal_email: eifion_1234609007_biz@asciicasts.com
    paypal_secret: foobar
    paypal_cert_id: DSGGUT3F4TTSW
    paypal_url: https://www.sandbox.paypal.com/cgi-bin/webscr
test:
    paypal_email: test@example.com
    paypal_secret: testsecret
    paypal_cert_id: X123456789
    paypal_url: testpaypalurl
production:
    paypal_email: seller@example.com
    paypal_secret: reallysecretpassword
    paypal_cert_id: EDRFGH909CERT
    paypal_url: https://www.paypal.com/cgi-bin/webscr
The configuration file with the variables for each environment.
We can now replace each hard-coded value with the appropriate key from the config file and the appropriate value will be read for the current environment. For example in the PaymentNotification model we can replace
params[:receiver_email] == "eifion_1234609007_biz@asciicasts.com"
with
params[:receiver_email] = APP_CONFIG[:paypal_email]
We won’t show the replacement of all of the other variables here, but each replacement follows the same form, replacing the hard-coded value with the appropriate key from the APP_CONFIG hash.
We’re Done!
The changes we’ve made to our application have made it much more secure against attempts to make fraudulent purchases. We have also made it much easier to change the configuration of our application dependent on whether we’re in development or production. This is the final episode on using PayPal for the whole checkout process. The next episode will concentrate on using ActiveMerchant.